Showing posts with label galaxy. Show all posts
Showing posts with label galaxy. Show all posts
Tuesday, March 28, 2017
How to Turn Off Factory Mode yellow text on Samsung Galaxy Tab
How to Turn Off Factory Mode yellow text on Samsung Galaxy Tab
How to Turn Off Factory Mode or Yellow Text on Samsung Smartphones and Samsung Galaxy Tablets.

Samsung manufacturing best tablets and no one have doubt on the quality and software support . samsung galaxy tab are the best tablet to buy . No matter if you talk about samsung galaxy tab specs or samsung galaxy tab price , Samsung Tabs are always on the top list of best tablet to buy.
Disabled Samsung galaxy functions while Factory Mode is turn on Samsung Tablet and Samsung Smartphones :
1. Yellow text on LCD Samsung Galaxy Tab and Smartphones.
2.Directly turn off after pressing power button.
3.Sim data disabled.
4. Unable to open apps while yellow text displaying on tablet.

How to Turn off Factory Mode on Samsung Galaxy tab or Samsung Galaxy Smartphones.
There is very easy ways to turn off factory mode or unwanted yellow text on your samsung smartphones or tablet but we will discuss the easy one . You need Superuser (Su) access in both ways. Super User or SU means you have to root your tablet or smartphone first.
How to Root Samsung Smartphones and Samsung Galaxy Tablets.
After successful root SU icon will be displayed on tablet or smartphone. Now you you need to download and install any Terminal Emulator from Google Play Store. Its time play with some commands on Samsung Smart Device.
Open Terminal
Type su (Allow SU to grant access if asked . )
Type rm /efs/factoryApp/keystr (if the message appear "rm failed for /efs/factoryApp/keystr no such directory") ignore it .
Type rm /efs/factoryApp/FactoryMode
Type echo -n ON >> /efs/FactoryApp/Keystr
Type echo -n ON >> /efs/FactoryApp/FactoryMode
Type chown 1000.1000 /efs/FactoryApp/Keystr
Type chown 1000.1000 /efs/FactoryApp/FactoryMode
Type chmod 0744 /efs/FactoryApp/Keystr
Type chmod 0744 /efs/FactoryApp/FactoryMode
reboot
Galaxy tablet or Galaxy Smartphone will be rebooted and you are done. Now the yellow text should not appear because this all happen when efs become corrupted. Now you have successfully repair efs. On / Off mode will be appear again. This method is personally tested on Samsung Galaxy Tab 2 , success rate was 100% . Work like charm.
For reference see image below.
How to Root Samsung Smartphones and Samsung Galaxy Tablets.
After successful root SU icon will be displayed on tablet or smartphone. Now you you need to download and install any Terminal Emulator from Google Play Store. Its time play with some commands on Samsung Smart Device.
 |
| Terminal Emulator |
Open Terminal
Type su (Allow SU to grant access if asked . )
Type rm /efs/factoryApp/keystr (if the message appear "rm failed for /efs/factoryApp/keystr no such directory") ignore it .
Type rm /efs/factoryApp/FactoryMode
Type echo -n ON >> /efs/FactoryApp/Keystr
Type echo -n ON >> /efs/FactoryApp/FactoryMode
Type chown 1000.1000 /efs/FactoryApp/Keystr
Type chown 1000.1000 /efs/FactoryApp/FactoryMode
Type chmod 0744 /efs/FactoryApp/Keystr
Type chmod 0744 /efs/FactoryApp/FactoryMode
reboot
Galaxy tablet or Galaxy Smartphone will be rebooted and you are done. Now the yellow text should not appear because this all happen when efs become corrupted. Now you have successfully repair efs. On / Off mode will be appear again. This method is personally tested on Samsung Galaxy Tab 2 , success rate was 100% . Work like charm.
For reference see image below.
  |
| ON/OFF Menu Appear |
 |
| No Yellow Text found |
Available link for download
Sunday, March 26, 2017
How To Take Screenshot in Samsung Galaxy S Duos 2 S7582
How To Take Screenshot in Samsung Galaxy S Duos 2 S7582

Even Galaxy S Duos 2 S7582 is an upgraded version , It has not much improvement over Galaxy S Duos S7562. Some of the improvements of S Duos 2 S7582 over S Duos S7562 are Android 4.2 Jellybean, Dual-core 1.2 GHz CPU, HD Video Recording (1280 x 720 PX), Faster Download Speed 21 Mbps etc.
In this post I included the steps to take screenshot in Galaxy S Duos 2 S7582 without using any third party software. In this latest model too Samsung provides the same key combo which used in the Android Jellybean of Galaxy S4, S3, S2, etc.
Take Screenshot in Galaxy S Duos 2 S7582
1. Go to the desired screen you want to capture.2. Then, Simultaneously press and hold the Power and Home button for 2-3 seconds.
Thats... You will hear a capture sound...if its success.
To get the captured picture Go to
Gallery -> Screenshots
Or
Go to /storage/sdcard0/Pictures/Screenshots
using any file manager.
Available link for download
Friday, March 24, 2017
How To Take Screen Shot in Galaxy Core Prime SM G360H
How To Take Screen Shot in Galaxy Core Prime SM G360H
 Yesterday I bought a new Galaxy Core Prime priced 9,000 INR in India. For the price tag you will get a 5 MP camera, 1.2 GH Quad Core processor, 1 GB RAM, Android Kitkat 4.4.4 etc. After using a day I feel the device has better performance, decent battery life. I wish the Auto brightness feature should be there, but, no. In this post I include the available screen capture methods in Galaxy Core Prime.
Here is the simple and common method to take screenshot on Galaxy Core Prime. Like some other Galaxy devices Galaxy Core Prime does not have an option to screen shot using palm swipe. Here is the key combo method to screen capture Galaxy Core Prime.
How To Take Screen Shot in Galaxy Core Prime SM-G360H?
1. Go to the desired screen you want to take a screenshot.2. Now, simultaneously press and hold the Power and Home button for 2-3 seconds.

Thats it... both of the method above tested and works great.
To get the captured picture Go to Gallery -> Screenshots
Or
Go to /storage/Pictures/Screenshots using any file manager.
Available link for download
Tuesday, March 21, 2017
Install PACMan ROM on AT T Galaxy S2 SGH i777 Jelly Bean Custom ROM
Install PACMan ROM on AT T Galaxy S2 SGH i777 Jelly Bean Custom ROM
How to Flash/Install PACMan ROM on AT&T Galaxy S2 SGH-i777 Jelly Bean Custom ROM/Firmware. PACMan ROM is a mixture of CM10.1, AOKP and Paranoid Android ROMs. All the best features of these three ROMs together in one single ROM. This Tutorial will guide you on How to Install PACMan ROM on AT&T Galaxy S2 SGH-i777 Jelly Bean Custom ROM. I have written some of the important tips below that you have to keep in mind before proceeding towards the installation.

Disclaimer: All the custom ROMs and firmwares, official software updates, tools, mods or anything mentioned in the tutorial belong to their respective owners/developers. We or the developers are not to be held responsible if you damage or brick your device. Proceed at your own risk.
Important Tips:
- Make sure your Galaxy S is rooted and have ClockworkMod Recovery installed -> How to Root and Install ClockworkMod Recovery on Galaxy S2 I9000.
- This Tutorial for flashing Tsunami X is only for Galaxy S GT-I9000, don’t try this on any other variants of Galaxy S GT-I9000.
- Charge your battery up to 70%.
- Make sure USB Debugging is enabled.
- This installation will wipe your data. Make sure to backup your phone data:
- Install Galaxy S2 SGH-i777 USB drivers -> Download USB Drivers for Galaxy S2 SGH-i777
I have written this detailed and easy to understand step-by-step instructions guide on How to Install PACMan ROM on AT&T Galaxy S2 SGH-i777 Jelly Bean 4.2.2 Custom ROM. If you are used to flashing custom roms on your device, then this should not be any different for you. However, for beginners, it is recommended that you read the whole tutorial before flashing this Custom Rom.
How to Install PACMan ROM on AT&T Galaxy S2 SGH-i777 Jelly Bean Custom ROM:
Required File(s):
- Download PACMan ROM (PAC i777 20.0.0 IconRunner.zip)
Step 1 – Download the required files mentioned above for Galaxy S to your computer.
Step 2 – Connect and mount your Galaxy S2 USB memory on your computer using the USB cable.
Step 3 – Now copy/paste the downloaded PAC i777 20.0.0 IconRunner.zip and Google Apps zip files to your SD card. Make sure the files are in the SD card root (not in any folder).
Step 4 – Then turn OFF your phone and disconnect from the USB cable.
Step 5 – Now to get in the Recovery Mode. Switch ON the phone while pressing and holding Volume Up + Home + Power buttons together.

NOTE: Screenshots of the ClockworkMod Recovery may change as new versions are released.
Step 6 – Once you are in ClockworkMod Recovery, select perform a full data wipe by selecting “wipe data/factory reset” as shown below. Use the Power button to select everything while in the Recovery Mode.

Step 7 – Then, perform a cache wipe by selecting “wipe cache partition” as you can see in the image below.

Step 8 – Now this is optional, but it is recommended to perform a wipe of your dalvik cache as well. You will not get into boot loops or any other errors. From CWM recovery, go to ‘advanced’ and then select “wipe dalvik cache”.

Step 9 – Then go back to the main recovery screen and select “install zip from SD card”.

Step 10 – Now select “choose zip from sdcard”. Using your volume keys, navigate to the PAC i777 20.0.0 IconRunner.zip file that you copied to your SD card and select it using the Power button. Confirm the installation on the next screen and the installation procedure should start now.

Google Apps: Repeat the above step for the Gapps zip file as well and install it on your phone.
Step 11 – After the installation completes, go to “+++++Go Back+++++” and reboot the phone by selecting “reboot system now” from the recovery menu as show below.
Your AT&T Galaxy S2 SGH-i777 will boot now and it might take about 5 minutes to boot on your first time. So, please wait.
Available link for download
Sunday, March 19, 2017
How To Update Galaxy S Advance I9070 to Official Stock Android Jelly Bean 4 1 2 Using Odin
How To Update Galaxy S Advance I9070 to Official Stock Android Jelly Bean 4 1 2 Using Odin

You can update your Galaxy S Advance to Official Android 4.1.2 via OTA or using Kies. If both of the methods not working to you follow this post to manually update Galaxy S Advance GT-I9070 to Official stock Android Jelly Bean 4.1.2 using Odin v1.85.
Note:
1. Backup your important data.
2. Enable USB debugging in your phone.
3. Battery must have 60% or more charge.
4. Disable or Exit Antivirus and Kies if you are installed.
5. Your PC must install Kies or Galaxy S Advance driver.
6. This method is only tested with Galaxy S Advance I9070 International version.
How To Update Galaxy S Advance to Official Stock Android Jelly Bean 4.1.2 Using Odin?
1. Download latest Galaxy S Advance Android Jelly Bean 4.1.2 for your country here.* If you have any trouble finding firmware from the link, just comment below with your country, then i will post the firmware link.
2. Extract the downloaded firmware zip.
3. Download Odin v1.85 - Download
4. Now, Extract and Open odin3 v1.85.exe.
5. Power off Galaxy your phone.
6. Now boot into download mode. ( Volume down + Home + Power )
7. In download mode connect your phone to PC.
8. Now look in to Odin... ID:COM box, it will be yellow with a port name and Added! message will be displayed.
( If not it will the problem of driver or USB ... check both )

9. In Odin..Click PDA button and browse to the extracted firmware folder and select the tar.md5 file eg. I9070XXXXXX_I9070XXXXXXX_HOME.tar.md5 finally Click Start button.
10. After complete update Odin will show PASS on top left and phone will reboot. now unplug phone from USB.
Thats it .... Done .
If you want to root the S Advance i9070 Android 4.1.2, follow the below post.
Galaxy S Advance i9070 Android 4.1.2, Root And Delete Unwanted System Apps To Speed Up The Device.
Available link for download
Saturday, February 18, 2017
Install CWM Root Samsung Galaxy Pocket
Install CWM Root Samsung Galaxy Pocket
Download dulu file yg diperlukan di bawah ini
Tools Root Pocket
Setelah di download akan ada 2 file zip
1. Update.zip
2.Cwm.zip
Simpan kedua file tersebut di memori internal hp tanpa folder.
Matikan hp samsungnya.
Dalam keadaan mati, tekan tombol volume atas + home + power, itu bertujuan untuk masuk ke dalam recovery.nya.
Setelah masuk, pilih aply update from sd card, lalu pilih file cwm.zip
Setelah terinstall cwm.nya, baru pilih file update.zip.
Jika sudah, pilih reboot system.
Ta daaaa…… Sukses root samsung galaxy pocketnya. :-)
Gampang kan!!!
Available link for download
Wednesday, February 15, 2017
Hybrid ROM v5 0 Custom ROM for Samsung Galaxy Y
Hybrid ROM v5 0 Custom ROM for Samsung Galaxy Y
Hybrid is one of thebest optional Custom Rom for Galaxy Y s5360 as it comes in two variants, one is lite for better and smooth performance, and the second is Standard with many stuffs which may cause few problems in performance. The rom contains Deodexed , Zipalign , Rooted , BusyBox , BusyBox run-parts support , Apps2SD Enable , Nano Text Editor , Bash Shell Support and Updated APN list. You can see the screenshots of galaxy Y running with this ROM below. If you want you can download the same by clicking on download button below.

Download Hybrid ROM
Available link for download
Saturday, February 11, 2017
How to Set Pattern Lock on Samsung Galaxy Gio GT S5660
How to Set Pattern Lock on Samsung Galaxy Gio GT S5660

Almost every day, you can see people around you draw diversified patterns on the phone screens to unlock their phones. If you haven’t set a pattern lock on your Samsung Galaxy Gio GT-S5660 phone, your curiosity for the method to set it by yourself will definitely be aroused. Hence, this post illustrates the detailed steps for your reference.
Steps to set a pattern lock on Samsung Galaxy Gio GT-S5660:
Step 1: Open Settings in the phone.
Step 2: Find and access Location and security.
Step 3: Locate and click Set screen lock.
Step 4: Choose Pattern to move on.
Step 5: Draw a pattern and tap Continue. Meanwhile, please note that the pattern must connect at least 4 dots.
Step 6: Draw the pattern again and click Confirm.
Related Articles:
How to Create A PIN Lock for Samsung Galaxy Gio GT-S5660
How to Set Password on Samsung GT-I8190N
How to Set Password on Samsung GT-I8268
Android USB Driver for Samsung
Available link for download
How to Set Password on Samsung Galaxy S3 I9300 I9308
How to Set Password on Samsung Galaxy S3 I9300 I9308

“Hi, guys. I want to set a password to lock the screen of my Samsung galaxy s3 i9300 phone, but I don’t know how to make it. So please kindly tell me the concrete method asap.”
To set password on Samsung Galaxy S3 I9300/I9308, you can follow the steps below.
Step 1: Open Apps and enter Settings.
Step 2: Choose Security to move on.
Step 3: Select Screen lock.
Step 4: Choose Password to go on.
Step 5: Type a password and click Continue.
FYI, the password must contain at least 4 characters, at least 1 letter included.
Related Articles:
Android USB Driver for Samsung
How to Enable and Disable USB Debugging in Samsung GALAXY Tab2
How to Set Password on Samsung GT-I8190N
How to Set Password on Galaxy S4 GT-I9500/GT-I9508
Available link for download
Saturday, February 4, 2017
How To Take Screen Shot in Galaxy S2 4 0 4 Stock ROM
How To Take Screen Shot in Galaxy S2 4 0 4 Stock ROM

Follow the simple steps to take screen shot in Galaxy S2 Stock 4.0.4 ROM.
Steps
1. Go to the screen you want to capture.
2. Simultaneously press and hold the Home Button + Power Button for 2 seconds.

Thats it. You will hear a capture sound and a Toast message. To get the captured image go to /sdcard/Pictures/Screenshots.
.
Available link for download
Thursday, January 12, 2017
How to Set Password on Samsung Galaxy Note 10 1 P600 P601
How to Set Password on Samsung Galaxy Note 10 1 P600 P601

To set a password to secure your Samsung Galaxy Note 10.1 P600/P601, you can follow the steps below.
Step 1: Click the Apps icon on the bottom right corner.
Step 2: Select Settings in the Apps interface.
Step 3: Choose Device on the top left.
Step 4: Tap Lock screen and choose Screen lock in the sub menu.
Step 5: Select Password to move on.
Step 6: Input a password (at least 4 characters, including at least 1 letter), and click Continue.
Step 7: Type the password again and tap OK.
Related Articles:
How to Set Password on Samsung ATIV S GT-I8750
How to Set Password on Galaxy S4 GT-I9500/GT-I9508
How to Enable and Disable USB Debugging in Samsung GALAXY Tab2
How to Open USB Debugging in Samsung Galaxy S5
Android USB Drivers for Samsung
Available link for download
Sunday, January 8, 2017
Install Android 4 4 kitkat ROM on Galaxy ACE 2
Install Android 4 4 kitkat ROM on Galaxy ACE 2
Android 4.4 kitkat ROM for Samsung Galaxy ACE 2 is now available to update your mobile. The Android 4.4 kitkat ROM for Galaxy ACE 2 is includes all the new features . You can update your phone to Android 4.4 kitkat Operating System by installing this custom ROM. Be aware before processing this tutorial that this is not an official update from Samsung. This is a custom ROM. So, all credits goes to the original developer.
Update your Samsung Galaxy to Android 4.4 kitkat using cyanogen mod(rom)

About :
CyanogenMod is a free, community built, aftermarket firmware distribution of Android 4.4 (KitKat), which is designed to increase performance and reliability over stock Android for your device. CyanogenMod is based on the Android Open Source Project with extra contributions from many people within the Android community. It can be used without any need to have any Google application installed. Linked below is a package that has come from another Android project that restore the Google parts. CyanogenMod does still include various hardware-specific code, which is also slowly being open-sourced anyway.
Code:
* * Your warranty is now void. * *
I am not responsible for bricked devices, dead SD cards, thermonuclear war, or you getting fired because the alarm app failed. Please do some research if you have any concerns about featuresincluded in this ROM before flashing it! YOU are choosing to make these modifications, and if you point the finger at me for messing up your device, I will laugh at you.
Screenshots:


Warning before installing Android 4.4 ROM on Samsung Galaxy Ace 2:
- We are not responsible for any damages that may happened due to using this ROM. If any problem happens that related to installing, we will help you to solve it.
- Use this guide at your own risk. We shall not have any liability or responsibility for whatever happens to you and your device by using the instructions in this guide.
- The instructions provided in this tutorial for educational purpose only. There is no guarantee that these steps will work for your device.
- The steps given in this tutorial is only to use with Samsung Galaxy Ace and the model number S5830. Applying this guide to any other device or any other model may produce many problems.
- Read and Understand the whole tutorial first, before going to perform the steps.
How to Install?
Disclaimer: We are not responsible for any damages on your device.
1: Be on Cyanogenmod 112: Download ROM and Gapps
3: Copy this file in sdcard
4: Reboot to Recovery
5: Backup your ROM
6:Wipe data, cache and dalvik
7: Go to Mounts and Storage and do a format /system (essential)
8: Come back to main menu and select "Install the Zip from External Storage (or dcard1)"
9: Choose and install the rom
10: Select "Install the Zip from External Storage (or sdcard1)" and install gapps zip
11: Reboot
This is an AOSP Rom, stock nexus devices ROM. It hasnt many feature.
G apps = HERE
Download:
ROM = HEREG apps = HERE
Available link for download
Wednesday, January 4, 2017
How To Turn Off Camera Shutter Sound in Galaxy Note 3 Note 2 And Many Other Android Devices
How To Turn Off Camera Shutter Sound in Galaxy Note 3 Note 2 And Many Other Android Devices

In this post I included all the available methods to disable camera shutter sound in Galaxy Note 3 and Note 2. If you have a different android phone try any of the method available in this post. Any of the method may work.
Method 1:
For those users of Galaxy Note 2 and Note 3 which have enabled the option to turn off the camera shutter sound by default.
1. Open your Camera Application.
2. In the camera app, click the Settings softkey.
3. On the next dialog...select settings tab ( third tab )
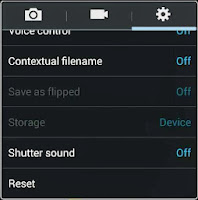
4. Finally Scroll down and tap on Shutter sound to off it.
Method 2 ( Require Root )
This method enables the hidden Shutter sound menu in Galaxy Note 3 and Note 2. You need to root the phone to get it work.
1. Download and install Note 2 Hidden Settings app from Play Store
2. Open the installed app and scroll down to get CAMERA SETTINGS
3. Under camera settings Toggle ON Add shutter sound menu and tap on Apply button.
4. Exit the app...and follow the Method 1.
Method 3
This method uses the app Enforced Stream Silencer to mute the camera shutter sound. This method works with many android devices other than Note 3 and Note 2..try your luck.
1. Download and install Enforced Stream Silencer from here
2. Open the app and check Disable STREAM_SYSTEM_ENFORCED.
3. Finally exit the app...done..
Available link for download
Sunday, December 25, 2016
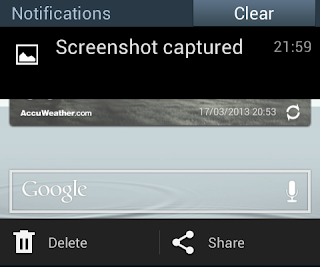
How To Take Screenshot in Galaxy S3 Galaxy S4 and Galaxy Note 2
How To Take Screenshot in Galaxy S3 Galaxy S4 and Galaxy Note 2

In this post i am included the simple two methods to take screenshot in Samsung Galaxy S2, Galaxy S4 and Galaxy Note 2. The methods includes the common key combination and the Palm swipe method.
How To Take Screenshot in Galaxy S3, Galaxy S4 and Galaxy Note 2 ?
Method 1 ( Key combo method )
1. Go to the desired screen you want to capture.
2. Now , simultaneously press and hold the Power and Home button for 2-3 seconds.
thats it..on success capture you will see Saving screenshot... notification with capture sound.
Method 2 ( Palm Swipe Method )
1. Go to Settings -> Motion ( Enable it if not enabled )
2. In Motion check Palm swipe to capture.
3. Now go to the desired screen you want to capture.
4. Finally Swipe your parm from right to left or left to right.
thats it... on success capture you will see a capturing effect on the screen with capture sound.
To get the captured picture Go to Gallery -> Screenshots Or Go to /storage/sdcard0/Pictures/Screenshots using any file manager.
Available link for download
Friday, December 23, 2016
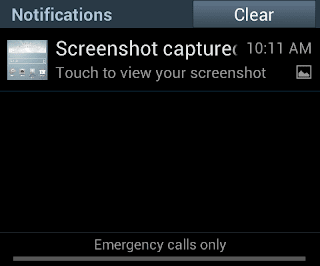
How To Take Screenshot in Galaxy Grand Duos I9082
How To Take Screenshot in Galaxy Grand Duos I9082

Update:
I was forget to include the Palm swipe method. Thanks Bayu Widyasanyata for mentioning it. Now the post updated with common Key combo and Palm swipe method.
How Take Screen Shot in Galaxy Grand Duos I9082 ?
Method 1 ( Key Combo Method )
1. Go to the desired screen you want to capture.
2. Now , simultaneously press and hold the Power and Home button for 2-3 seconds.
Method 2 ( Palm Swipe Method )
1. Go to Settings -> Motion ( Enable it if not enabled )
2. In Motion check Palm swipe to capture.
3. Now go to the desired screen you want to capture.
4. Finally Swipe your parm from right to left or left to right.
Thats it... both of the method above tested and works great.
To get the captured picture Go to Gallery -> Screenshots Or Go to /storage/sdcard0/Pictures/Screenshots using any file manager.
Available link for download
Tuesday, December 6, 2016
How To Take A Screenshot in Samsung Galaxy S2 I9100
How To Take A Screenshot in Samsung Galaxy S2 I9100

Taking screen shot in Samsung Galaxy S2 is very easy. No application needed to capture the screen.
How To:
1. Press and Hold down the HOME button and then press the POWER button immediately before launching the recent apps window.
- You should hear a sound of a screenshot being taken and you should see a text that shows it has been captured and saved.
Done !! Now navigate to /sdcard/ScreenCapture or open galary to get the captured screen.
Tested This method, Works great with ofiicial Rom ( Android 2.3+ ) and not works with Resurrection Remix ics v1.3 Rom.
Available link for download
Monday, November 28, 2016
How To Take Screenshot in Galaxy Core Duos GT I8262
How To Take Screenshot in Galaxy Core Duos GT I8262

In this post i included the steps to capture screenshot in Galaxy Core GT-I8262 without using any third party app. We can take the screenshot of Galaxy Core duos using the same key combo uses in other Galaxy devices like Galaxy S3,Galaxy S4,Note 2, etc.
Samsung Galaxy Core Duos GT-I8262 Screenshot
1. Go to the screen you want to capture.2. Now , Press and hold the Power and Home button for 2-3 seconds.
Thats it...On successful capture you will hear a capture sound and will see a white border animation in the screen.
To get the captured picture
Go to Gallery -> Screenshots
Or
Go to /storage/sdcard0/Pictures/Screenshots using any file manager.
Available link for download
Friday, November 18, 2016
How to Set Password on Samsung Galaxy S2 I9100
How to Set Password on Samsung Galaxy S2 I9100

One of the common and effective methods to protect the Samsung Galaxy S2 I9100 phone is to set a password to lock its screen, which can be realized by the detailed steps illustrated in this article.
Steps to set password on Samsung Galaxy S2 I9100are as follows:
Step 1: Press the bottom-left Menu Key and select Settings to access it.
Step 2: Choose Security to move on.
Step 3: Click Set screen lock.
Step 4: Select Password.
Step 5: Enter a password with at least 4 characters (including at least 1 letter) and tap Continue when finished.
Related Articles:
How to Set Password on Samsung Galaxy S3 I9300/I9308
How to Set Password on Galaxy S4 GT-I9500/GT-I9508
How to Set Password on Samsung GT-I8190N
How to Set Password on Samsung GT-I8268
How to Open USB Debugging in Samsung Galaxy S5
Available link for download
Subscribe to:
Posts (Atom)