Showing posts with label install. Show all posts

Tuesday, March 21, 2017

Install PACMan ROM on AT T Galaxy S2 SGH i777 Jelly Bean Custom ROM

Install PACMan ROM on AT T Galaxy S2 SGH i777 Jelly Bean Custom ROM


How to Flash/Install PACMan ROM on AT&T Galaxy S2 SGH-i777 Jelly Bean Custom ROM/Firmware. PACMan ROM is a mixture of CM10.1, AOKP and Paranoid Android ROMs. All the best features of these three ROMs together in one single ROM. This Tutorial will guide you on How to Install PACMan ROM on AT&T Galaxy S2 SGH-i777 Jelly Bean Custom ROM. I have written some of the important tips below that you have to keep in mind before proceeding towards the installation.
ATT-galaxy-s2-i777
Disclaimer: All the custom ROMs and firmwares, official software updates, tools, mods or anything mentioned in the tutorial belong to their respective owners/developers. We or the developers are not to be held responsible if you damage or brick your device. Proceed at your own risk.
Important Tips:
  • Make sure your Galaxy S is rooted and have ClockworkMod Recovery installed -> How to Root and Install ClockworkMod Recovery on Galaxy S2 I9000.
  • This Tutorial for flashing Tsunami X is only for Galaxy S GT-I9000, don’t try this on any other variants of Galaxy S GT-I9000.
  • Charge your battery up to 70%.
  • Make sure USB Debugging is enabled.
  • This installation will wipe your data. Make sure to backup your phone data:
  • Install Galaxy S2 SGH-i777 USB drivers -> Download USB Drivers for Galaxy S2 SGH-i777
I have written this detailed and easy to understand step-by-step instructions guide on How to Install PACMan ROM on AT&T Galaxy S2 SGH-i777 Jelly Bean 4.2.2 Custom ROM. If you are used to flashing custom roms on your device, then this should not be any different for you. However, for beginners, it is recommended that you read the whole tutorial before flashing this Custom Rom.

How to Install PACMan ROM on AT&T Galaxy S2 SGH-i777 Jelly Bean Custom ROM:

Required File(s):
  • Download PACMan ROM (PAC i777 20.0.0 IconRunner.zip)
Step 1 – Download the required files mentioned above  for Galaxy S to your computer.
Step 2 – Connect and mount your Galaxy S2 USB memory on your computer using the USB cable.
Step 3 – Now copy/paste the downloaded PAC i777 20.0.0 IconRunner.zip and Google Apps zip files to your SD card. Make sure the files are in the SD card root (not in any folder).
Step 4 – Then turn OFF your phone and disconnect from the USB cable.
Step 5 – Now to get in the Recovery Mode. Switch ON the phone while pressing and holding Volume Up + Home + Power buttons together.
Reboot-System-Clockwork
NOTE: Screenshots of the ClockworkMod Recovery may change as new versions are released.
Step 6 – Once you are in ClockworkMod Recovery, select perform a full data wipe by selecting “wipe data/factory reset” as shown below. Use the Power button to select everything while in the Recovery Mode.
Wipe-Data-ClockworkMod
Step 7 – Then, perform a cache wipe by selecting “wipe cache partition” as you can see in the image below.
Wipe-Cache-ClockworkMod
Step 8 – Now this is optional, but it is recommended to perform a wipe of your dalvik cache as well. You will not get into boot loops or any other errors. From CWM recovery, go to ‘advanced’ and then select “wipe dalvik cache”.
Wipe-Dalvik-Cache-ClockworkMod
Step 9 – Then go back to the main recovery screen and select “install zip from SD card”.
Install-zip-from-sdcard-ClockworkMod
Step 10 – Now select “choose zip from sdcard”. Using your volume keys, navigate to the PAC i777 20.0.0 IconRunner.zip file that you copied to your SD card and select it using the Power button. Confirm the installation on the next screen and the installation procedure should start now.
Choose-zip-from-sdcard-ClockworkMod
Google Apps: Repeat the above step for the Gapps zip file as well and install it on your phone.
Step 11 – After the installation completes, go to “+++++Go Back+++++” and reboot the phone by selecting “reboot system now” from the recovery menu as show below.
Reboot-System-Clockwork
Your AT&T Galaxy S2 SGH-i777 will boot now and it might take about 5 minutes to boot on your first time. So, please wait.


Available link for download

Read more »

Install Modem Driver Windows Xp

Install Modem Driver Windows Xp


Info about driver install modem driver windows xp. This file is safe, uploaded from secure source and passed McAfee virus scan!

Driver Info:

File: install_modem_driver_windows_xp.exe
Category: modem
Version: 1.2.4
Size of file: 7 390 KB
System: Windows 7, Win Vista, Win XP


Available link for download

Read more »

Saturday, March 11, 2017

Install JellyBean On HTC Explorer A310E Pico JellySlash CM10

Install JellyBean On HTC Explorer A310E Pico JellySlash CM10


How To Install JellyBean CM10 On HTC Explorer A310E Pico [JellySlash]


HTC Explorer is a great entry level budget android phone with loads of stuff. Thanks to the mighty HTC hardware this little device can power even the jellybean with a 600MHz CPU.

Before Starting: You Can Also Check-

1. Root HTC Explorer A310E
2. Install CWM Recovery on HTC Explorer
3. Install ICS On HTC Explorer using CyanogenMod9

HTC Explorer can really handle the ROM without much lags or any sort of disturbances.

Warning:

Instructions: Must Read 

Before Installing The ROM You have To Install CWM Recovery. It can be done only after rooting your phone. Backup all your Data since installing new rom will erase phone data.
We arent responsible for any damage happened to your phone. Rooting can Void Warranty. Dont try this guide if you have no idea about rooting or any of the mentioned procedures.


Before Starting:

1. Root Your Phone + Unlock bootloader. Click here for procedure. 
2. You have to install A CWM recovery.- Click here
3. Make sure you have atleast 65% of battery charge to spare.
4. Download The .zip ROM from source-Download
5. You wont get Google Apps in this Rom, so you have to get the zip for Gapps installation. Download them for CM10.

Lets Start:


1. Download .zip ROM file and kernel file from the link.
2. Connect your phone to PC using USB cable- dont forget to enable USB debugging 

3. Copy both files to the external memory. Don’t extract them. ( Its better to place files on SD). If you want you can place the GApps in phone, copy the files also.

4. Disconnect mobile from PC and Turn it off by long pressing power button.
5. Enter into the bootloader mode. To enter into bootloader mode, Hold Volume Down + Power Button simultaneously until bootloader mode appears.
6. In bootloader menu navigate using volume keys and highlight recovery and enter into recovery mode by pressing Power button. You will now reach Custom recovery.
7. Now wipe "data/factory reset" and then " wipe cache partition " to wipe all the data and caches respectively on the phone.
8. Now lets Flash the ROM. Select install zip from sdcard and then choose zip from sdcard. Then select the CyanogenMod 10 file and install.
9. The installation takes some time to finish. 
Note: If you want to install GAPPS then repeat the step of install zip from sdcard and chose zip from sdcard. But this time chose Gapps package.


10. After successful flashing of both the files, select  +++++Go back+++++  and then reboot system now. Normally the first boot takes quite a lot of time. Please be patient. 


You have successfully Installed Jellybean On HTC Explorer Pico using CM10.


Available link for download

Read more »

Wednesday, March 1, 2017

Install New Audio Driver For Windows Vist

Install New Audio Driver For Windows Vist


Download install new audio driver for windows vist. File is safe, uploaded from tested source and passed Kaspersky virus scan!

Driver Info:

File: install_new_audio_driver_for_windows_vist.exe
Category: audio
Driver version: 2.0.6
File size: 3 907 KB
System: Win XP, Win Vista, Windows 7, Windows 8


Available link for download

Read more »

Sunday, February 26, 2017

Install Android Lollipop On Mi3

Install Android Lollipop On Mi3


Install Android Lollipop On Mi3

INSTALL ANDROID LOLLIPOP ON MI3 [EASILY EXPLAINED].


Hello, All the mi3 users.There is a good news for all you guys who want to experience Android Lollipop on their phones. Android L has been launched for your phones [UNOFFICIAL] which means you have to flash a custom rom for that.

Disclaimer :

/* Your warranty is now void.
*

* I am not responsible for bricked devices, dead SD cards,

* thermonuclear war, or you getting fired because the alarm app failed. Please

* do some research if you have any concerns about features included in this ROM

* before flashing it! YOU are choosing to make these modifications, and if

* you point the finger at me for messing up your device, I will laugh at you.
*/

OBJECTIVES:-

1. How to flash the Android L custom rom on your Xiaomi mi3.

2. How to root your phone.

 Objective 1--
Things required-

1. CWM Recovery (http://goo.gl/NQPMM0 ==>Download and use R8 zip only

2. Lollipop custom rom ( http://d-h.st/wVrG )

3. Lollipop  Gapps ( http://goo.gl/fkt3XM)

NOTE -
Before getting started I want to warn you that there are some of the bugs present in this rom.
List of  "BUGS" :-
1. NFC is not working.
 (Fix==> It doesnt have any fix till now. sorry )

2. There are Random Auto Reboot
 (Fix==> Install an app called Wake Lock from play store and set it to PARTIAL_WAKE_LOCK. This will prevent the device from deep sleep and fix Random Reboots )

3. Camcorder is not able to save videos
 (Fix==> Use any Third party camera from play store for this like Camera Next).

4. Screen turns ON if menu or back button is touched. 
(Fix==>You can disable the buttons and use Navigation Bar)


Available link for download

Read more »

Saturday, February 18, 2017

Install CWM Root Samsung Galaxy Pocket

Install CWM Root Samsung Galaxy Pocket


Download dulu file yg diperlukan di bawah ini
Tools Root Pocket
Setelah di download akan ada 2 file zip
1. Update.zip
2.Cwm.zip
Simpan kedua file tersebut di memori internal hp tanpa folder.
Matikan hp samsungnya.
Dalam keadaan mati, tekan tombol volume atas + home + power, itu bertujuan untuk masuk ke dalam recovery.nya.
Setelah masuk, pilih aply update from sd card, lalu pilih file cwm.zip
Setelah terinstall cwm.nya, baru pilih file update.zip.
Jika sudah, pilih reboot system.
Ta daaaa…… Sukses root samsung galaxy pocketnya. :-)
Gampang kan!!!


Available link for download

Read more »

Friday, February 17, 2017

install Android apps games remotely in Android Smartphone and Tablets

install Android apps games remotely in Android Smartphone and Tablets


How to install Android apps & games remotely in Android Smartphone and Tablets . 


Install directly from Google Play Store without touching Android Smartphones or tablets. 

Google has facilitate its customer as much as they can . With incredible services and offers , Google is always world number 1 with search engine , Google play store ,developments, blogging, webmaster tools,SEO (search engine optimization ), advertising and of course Android and many more . On Google Play Store you can find million apps and games for your smartphones and tablet which facilitate and make your life easier. Its too easy to install apps and games via WIFI or 3G from Google Play Store. Tap Google Play Store Icon and simply find out what you need. There is another superb option or method for installing android apps and games remotely into your smartphone or tablet without touching or in case its thousand miles away from you .
1. On smartphone or tablet , Activate WIFI , or 3G . Then go to setting --Accounts--Add account--Gmail.
2. Add your gmail account and password. 
3. Open https://play.google.com/store  on your computer .


4. Sign In with same Gmail account which you already added in your smartphones or android tablets
5.Choose any app or game . (for tutorial I choose Sketch Art). 


6. Click Install . 


7. Choose a desired device  (if you have more than one devices synchronised ) and click install . I have selected Samsung Galaxy S2 GT-1900 for the tutorial


8.A Congratulations message will be appeared . 


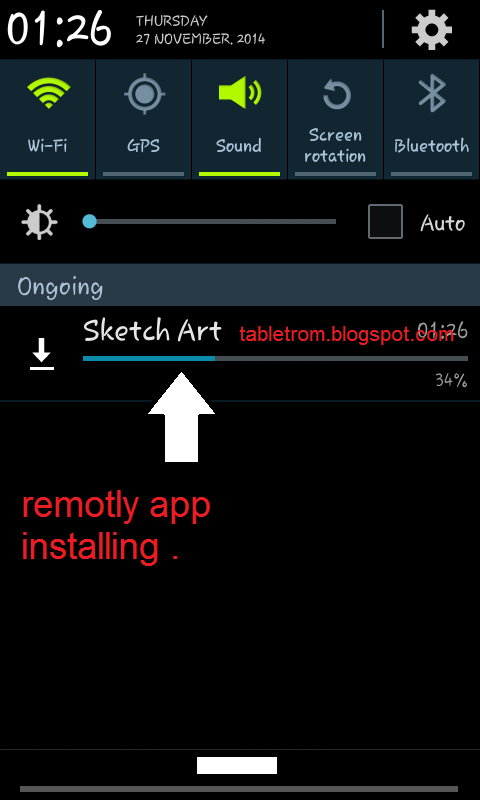
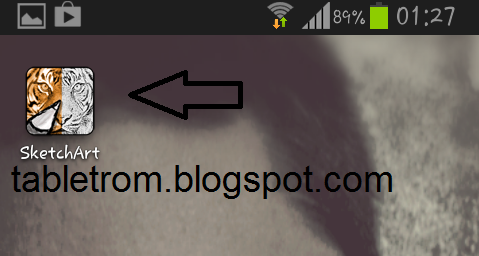
9. Just look at the smartphone you will see automatically application downloading will be started. (as shown above image).


10. You are done .

Now enjoy the great benefit of being Android and Google User

Note:- All the logo and images are property of their respected owners. 


Available link for download

Read more »

Wednesday, February 15, 2017

Install Android 4 4 KitKat launcher on any Android

Install Android 4 4 KitKat launcher on any Android


As we all know Android 4.4 has been officially launched
Here is a set of files which will bring Kitkat Launcher to our devices

Warning: While there is little to no risk in damaging your phone during this process, proceed at your own risk as we are not responsible for any issues that may occur with your device. 

DOWNLOAD

* NOTE = If the above download link does not open then press 
windows button+ F5  till the page does not load......

Now, before we proceed, this will only work as long as you have Jelly Bean 4.1 and above. If you do have it, then here’s what you need to do:

      • Download the following * file ‘launcher4.4.zip’.
      • Once downloaded, unzip the file and you’ll have 3 APKs inside – ‘GoogleHome.apk’, ‘PrebuiltGmsCore.apk’ and ‘Velvet.apk’.
      • Next, transfer all the APKs to your phone. You can place them in the root or create a new folder for them, doesn’t matter.
      • Use a file manager to browse to these APKs from your phone and install them in this order – PrebuiltGmsCore.apk, Velvet.apk and GoogleHome.apk. All these files have to be installed in order for the launcher and Google Now to work correctly.
      • Now, simply select the launcher by pressing the ‘Home’ button and you’re all set.

      kitkat


      Available link for download

      Read more »

      install canon printer

      install canon printer


      Drivertuner is a specialized drivers download pro that can relieve your anxiety towards driver issues. I believe that most computer users are not new to drivers as they play an important role in the normal working of hardware devices and the operating system or software that use it. If you want to know a proper way for solving it, then it is the right place for you.


      Download the latest drivers for computer

      Keep drivers updated and away from driver issues

      Optimize and speed up pc performance


      Drivertuner is expert install canon printer that can automatically scan, detect and recommend the latest and the most suitable drivers for your notebook. It is easy in operation that only need to follow three steps, and users can give a few clicks to control the whole process. Besides, it is suitable for nearly all driver kinds, famous digital brands in the market and Windows OS. There is a large database in Drivertuner where stored more than ten million drivers. When you encounter with driver issues, please do not feel hesitated and find support form Drivertuner.


      Key Features


      Supported Driver Types


      How to update drivers?

      Step one, download and install Drivertuner.

      Step two, scan for needed drivers.

      Step three, download and install the latest and the most suitable drivers.
      links:epson scanner drivers is sophisticated driver pro which is capable of improve your Epson printer drivers and other Epson devices. This utility is can decrease you of worries about installing an incorrect or out-of-date driver for your laptop. epson driver download is a specific application which is designed to search your system, download and install EPSON official drivers to enable your EPSON devices program properly.
      toshiba downloads is a wonderful driver instrument that will advance your toshiba laptop drivers and other devices drivers easily. With toshiba printer drivers, there is no worry for driver problems.
      Being puzzled by driver issues? With hp webcam driver, there is no worry for them as hp laptop drivers is the best selection to retain your notebook hp drivers and other drivers updated.
      With lexmark drivers for mac you can keep your PC running powerful with high-level system driver eliminate, which even deletes those files, directories and registry entries that are left behind by the normal vendor uninstallers. The brief and user friendly interface steer you step-by-step in the omit of the different type of device drivers, such as sound, printer, keyboard, mouse and graphic card drivers. www.lexmark.com automatically updates its cleaning process by using the driver database to ensure the best possible removal of Windows device drivers, including unused, conflicting and unwanted drivers.
      Logitech is an international market leader in devices that connect you to digital information and the Internet, letting you work, play, learn, and communicate more efficiently in the digital world, which owns many equipment in sorts of fields, such as PC keyboards, mice and trackballs. drivers download focus on in updating these drivers of the products. logitech webcam driver download can bring up a list of all the hardware on your computer, the current driver edition, and which ones have more recent versions available on line.


      Available link for download

      Read more »

      Friday, February 10, 2017

      Install Backtrack 5 on USB flash memory stick

      Install Backtrack 5 on USB flash memory stick


      http://www.coresec.org/2011/05/15/tip-install-backtrack-5-on-usb-flash-memory-stick/


      Available link for download

      Read more »

      Install ulang atau flash OS Black Berry 9790 Bellagio dijamin Work 100

      Install ulang atau flash OS Black Berry 9790 Bellagio dijamin Work 100


      Salam Localtechno kali ini localtechno akan berbagi dengan sobat semua tentang mengatasi masalah error 507 dan install ulang atau flash OS Black Berry 9790 Bellagio dijamin work 100% karena saya sudah melakukan nya sendiri dan berhasil... semoga sobat juga akan berhasil nantinya... :)

      Nah pertama-tama sobat download dulu bahannya di bawah ini :

      1. 1. Download Software BB nya di SINI (yang saya gunakan praktek) atau Download Software sesuai kebutuhan di SINI
      2. 2. Black Berry Desktop Manager download di SINI
      Nah setelah semua selesai sobat download, saat nya kita menuju ke TKP :

      1. 1. Install "9790jAllLang_PBr7.1.0_rel2105_PL9.16.0.159_A7.1.0.746_Telkomsel.exe" tinggal klik next dan next dan tunggu hingga proses selesai.
      2. 2. Install Black Berry Desktop Manager, cara nya sama tinggal ikutin perintah next dan next
      3. 3. Colokkan HH Black berry sobat menggunakan kabel USB jangan kabel Monitor PC :v dan tunggu hingga proses install driver secara otomatis dari OS windows 7 ultimate dan HH Black Berry sobat yang setengah hidup itu.
      4. 4. Pergi ke drive C:/Program File/Common Files/Research In Motion/AppLoader/ nah di folder inilah sobat hapus dulu file bernama "vendor.xml"
      5. 5. Setelah menghapus file vendor.xml jangan lupa klik loader.exe yang sudah jadi satu di folder vendor.xml tadi dan tunggu proses nya hingga selesai.
      6. 6. Setelah itu sobat jalankan Black Berry Desktop Manager nya, akan secara otomatis mendeteksi jenis dan tipe Black Berry sobat (dalam hal ini sobat tinggal nuggu nanti akan ada permintaan update software dan repair, sobat pilih update dulu baru repair dan tinggal ikutin perintah yang akan muncul nanti.
      7. 7. Tinggal ikutin perintah yang muncul dari update dan repair software dan tunggu prosesnya sampai selesai, Insyaallah tuntas gan... :)

      Sobat juga bisa lihat hasil akhir screenshot dan video tutorial yang sempat localtechno abadikan dan localtechno sebar, biar bisa bermanfaat untuk semua orang... :) silahkan cek di bawah ini :


      Udah gitu aja semoga bermanfaat salam Localtechno ^_^


      Available link for download

      Read more »

      Wednesday, February 1, 2017

      Install LibreOffice 5 0 In Ubuntu Or Linux Mint Via PPA

      Install LibreOffice 5 0 In Ubuntu Or Linux Mint Via PPA


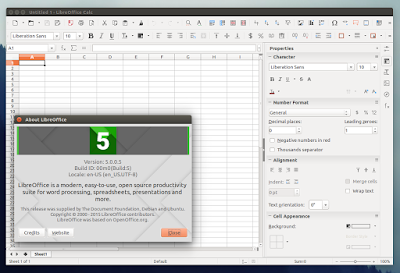
      LibreOffice 5.0 was released last week and it includes numerous changes, such as UI improvements, better HiDPI support, new icon theme by KDE called Breeze, much improved Spreadsheet, better filters for documents and more. For a complete list of changes, see THIS page.

      LIbreOffice 5.0

      According to the Document Foundation blog, the latest LibreOffice 5.0 is the "cornerstone of the mobile clients on Android and Ubuntu Touch, as well as the upcoming cloud version".

      In Ubuntu, Linux Mint and derivatives, the latest LibreOffice 5.0 (Fresh) can be installed either by using a PPA or by downloading and installing the official LibreOffice debs.

      Installing LibreOffice via PPA and not by using the official *.deb files is the recommended way of installing/upgrading LibreOffice in Ubuntu (as stated here) because the .deb files provided by  The Document Foundation are intentionally built against a very old baseline for maximum compatibility.

      Furthermore, by using the PPA, you can automatically get updates as well as easily go back to the LibreOffice version available in the official Ubuntu repositories if for some reason youre not satisfied with the new release, by using PPA Purge.

      Below youll find instructions on how to install LibreOffice in Ubuntu or Linux Mint via PPA as well as how to purge the PPA in case you want to go back to the LibreOffice version you were using before adding this PPA.


      Install LibreOffice 5.0 in Ubuntu Or Linux Mint via PPA


      Important: There are two PPAs you can use to install LibreOffice 5.0 in Ubuntu and Linux Mint: the LibreOffice Fresh PPA which provides the latest stable LibreOffice Fresh (so for instance when LibreOffice 5.1 comes out, this PPA will be updated with LibreOffice 5.1) and the LibreOffice 5.0.x PPA (which Ive used for the instructions below) which only provides LibreOffice 5.0.x updates.

      Right now, both PPAs provide the same LibreOffice version. If you prefer to use the LibreOffice Fresh PPA, replace "ppa:libreoffice/libreoffice-5-0" in the commands below with "ppa:libreoffice/ppa".


      At the time Im writing this article, the LibreOffice 5.0.x PPA provides LibreOffice 5.0.0 RC5 which is identical to the final release.

      Linux Mint 17.2 only: LibreOffice is pinned in Linux Mint 17.2 and cant be upgraded by using a PPA. To be able to update LibreOffice to version 5.0 via PPA, you need to create a file called "libreoffice-libreoffice-5-0.pref" under /etc/apt/preferences.d/ - to do this automatically, use the following command:
      gksu gedit /etc/apt/preferences.d/libreoffice-libreoffice-5-0.pref
      and in this file, paste this:
      Package: *
      Pin: release o=LP-PPA-libreoffice-libreoffice-5-0
      Pin-Priority: 701

      Then save the file and continue with the instructions below.

      To add the LibreOffice 5.0.x PPA and upgrade to the latest LibreOffice 5.0 in Ubuntu 15.04, 14.04 or 12.04 / Linux Mint 17.2 (after following the steps above), 17.1, 17 or 13, use the following commands:
      sudo add-apt-repository ppa:libreoffice/libreoffice-5-0
      sudo apt-get update
      sudo apt-get dist-upgrade

      If you want to try the new Breeze LibreOffice icon theme (which you can see in the screenshot above), install it by using the following command:
      sudo apt-get install libreoffice-style-breeze
      To change the icon theme in LibreOffice, go to Tools > Options > LibreOffice > View and set the icon style to Breeze.


      How to revert the changes


      If you dont want to continue using LibreOffice 5.0, you can downgrade it to the previous version available in the repositories by using PPA Purge. To do this, firstly install PPA Purge:
      sudo apt-get install ppa-purge

      Then, purge (this will disable the PPA and downgrade the packages installed from this PPA) the PPA using the following command:
      sudo ppa-purge ppa:libreoffice/libreoffice-5-0

      For Linux Mint, youll have to specify the Ubuntu codename because PPA Purge doesnt officially support it. So for Linux Mint 17, 17.1 and 17.2 which are based on Ubuntu 14.04 Trusty Tahr, use the following command:
      sudo ppa-purge -d trusty ppa:libreoffice/libreoffice-5-0

      Or, for Linux Mint 13 (based on Precise), use:
      sudo ppa-purge -d precise ppa:libreoffice/libreoffice-5-0


      Available link for download

      Read more »

      Sunday, January 29, 2017

      Install MediaTek Preloader USB VCOM Port pada windows

      Install MediaTek Preloader USB VCOM Port pada windows


      Saya akan share Tutorial cara penginstallan MediaTek Preloader USB VCOM Port pada windows7/8, hal ini sangat diperlukan ketika Flash ulang Android. Okay langsung ke materi.

      Peralatan yang diperlukan :
      - Driver USB VCOM Driver [http://adf.ly/1Rd3ip]


      Langkah install :

      1. Extract File USB VCOM Driver dan HP harus tersambung ke Komputer dalam keadaan menyala.


      2. Klik Start Menu - Klik kanan pada My Computer - Manage - Computer Management - klik (1)Device Manager - Klik sembarang pada bagian sebelah kanan misal (2)Other Devices - Klik Menu (3)Action - pilih (4) Add legacy hardware.


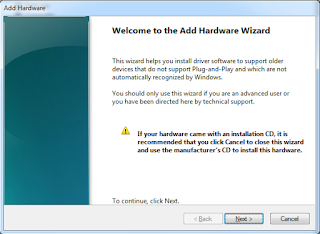
      3. Anda akan diarahkan ke menu Add Hardware - Next.

      4. Pilih yang bawah "Install the hardware that I manually select from a list (Advanced)" pilihan ini untuk penginstallan driver secara manual.

      5. Pada pilihan "Common hardware types:" biarkan Cursor tetap di "Show All Devices" dan tekan Next.

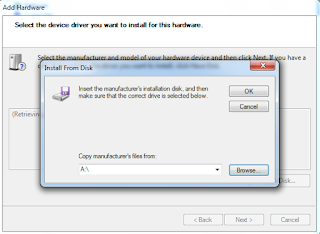
      6. Pada pilihan "Select the device driver you want to install for this hardware" tekan "Have Disk...".

      7. Pada pilihan "Install From Disk" - klik "Browse" arahkan ke folder "USB VCOM DriverWin7" dan file "usb2ser_Win7.inf" lalu klik open kemudian tekan OK. (Note : sesuaikan file dengan bit dan OS Windows yang digunakan, jika 64 Bit gunakan yang 64).


      8. Pada pilihan "Model" pilih yang paling atas "Mediatek DA USB VCOM Port" lalu next dan tunggu sampai driver terinstall. (Note : pada poin nomor 9 lakukan hal ini pada 4 Model dibawahnya)

      - Jika muncul Windows Security pilih "Install this driver software anyway" dan tunggu sampai proses install driver selesai.

      - Jika sudah selesai proses install driver "Mediatek DA USB VCOM Port" akan muncul "Completing the Add Hardware Wizard" dan pada Port Device Manager muncul Mediatek DA USB VCOM Port (COMx) dengan gambar tanda seru berwarna kuning, abaikan tanda serunya. Pada tahap ini sudah selesai penginstallan "Mediatek DA USB VCOM Port".


      9. Ulangi poin nomor 2 hingga nomor 8 pada 4 model dibawah ini, untuk file "usb2ser_Win7.inf" sama saja.

      - Mediatek PreLoader USB VCOM Port
      - MTK USB Debug Port
      - MTK USB Modem Port
      - MTX USB Port

      10. Jika sudah selesai secara keseluruhan maka pada port Device Manager akan muncul 5 port plus dengan posisi COM-nya.

      - Mediatek DA USB VCOM Port(COM1)
      - Mediatek PreLoader USB VCOM Port(COM4)
      - MTK USB Debug Port(COM5)
      - MTK USB Modem Port(COM6)
      - MTX USB Port(COM7)


      Semoga Tutor ini membatu, amin :D

      Author : M.Shohib / Mr.Oib a.k.a Sudden_death


      Available link for download

      Read more »