Showing posts with label on. Show all posts

Tuesday, March 28, 2017

How to Turn Off Factory Mode yellow text on Samsung Galaxy Tab

How to Turn Off Factory Mode yellow text on Samsung Galaxy Tab


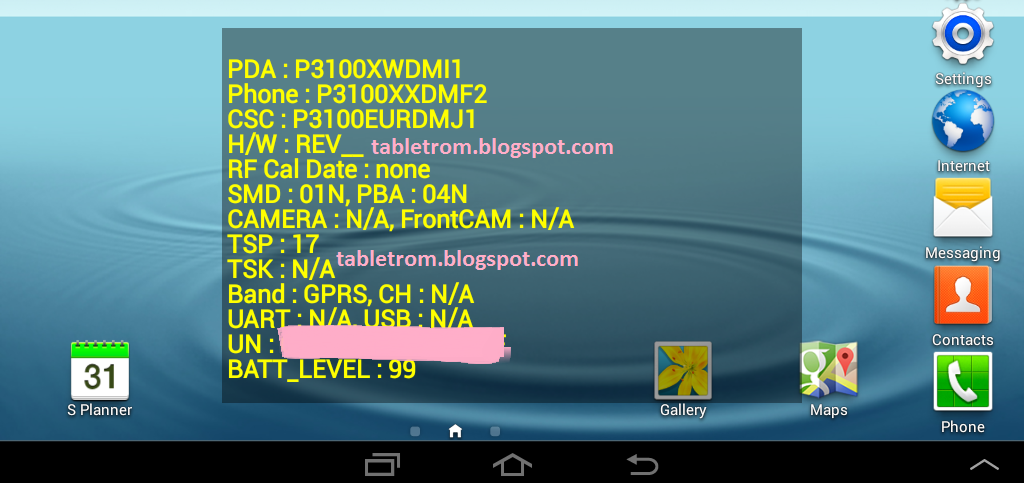
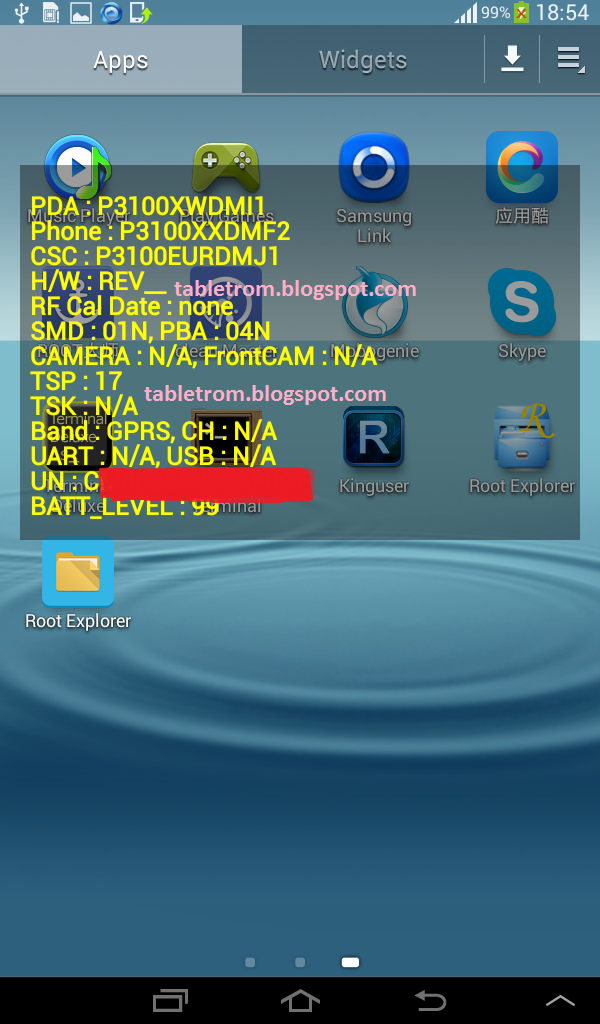
How to Turn Off Factory Mode or Yellow Text on Samsung Smartphones and Samsung Galaxy Tablets. 


Samsung Galaxy Tab samsung smartphones


Samsung manufacturing best tablets and no one have doubt on the quality and software support . samsung galaxy tab are the best tablet to buy . No matter if you talk about samsung galaxy tab specs or samsung galaxy tab price , Samsung Tabs are always on the top list of  best tablet to buy. 

Disabled Samsung galaxy functions while Factory Mode is turn on Samsung Tablet and Samsung Smartphones :

1. Yellow text on LCD Samsung Galaxy Tab and Smartphones.
2.Directly turn off after pressing power button.
3.Sim data disabled. 
4. Unable to open apps while yellow text displaying on tablet.

Samsung Galaxy Tab samsung smartphones

How to Turn off Factory Mode on Samsung Galaxy tab or Samsung Galaxy Smartphones. 

There is very easy  ways to turn off factory mode or unwanted yellow text on your samsung smartphones or tablet but we will discuss the easy one . You need Superuser (Su) access in both ways. Super User or SU means you have to root your tablet or smartphone first.

How to Root Samsung Smartphones and Samsung Galaxy Tablets. 

After successful root SU icon will be displayed on tablet or smartphone. Now you you need to download and install any Terminal Emulator from Google Play Store. Its time play with some commands on Samsung Smart Device.


Samsung Galaxy Tab samsung smartphones
Terminal Emulator 


Open Terminal 

Type  su  (Allow SU to grant access if asked . )
Type rm /efs/factoryApp/keystr (if the message appear "rm failed for  /efs/factoryApp/keystr no such directory") ignore it . 
Type  rm /efs/factoryApp/FactoryMode
Type  echo -n  ON  >>  /efs/FactoryApp/Keystr
Type  echo -n  ON  >>  /efs/FactoryApp/FactoryMode
Type  chown 1000.1000  /efs/FactoryApp/Keystr
Type  chown 1000.1000  /efs/FactoryApp/FactoryMode
Type  chmod 0744 /efs/FactoryApp/Keystr
Type  chmod 0744 /efs/FactoryApp/FactoryMode
reboot

Galaxy tablet or Galaxy Smartphone will be rebooted and you are done. Now the yellow text should not appear because this all happen when efs become corrupted. Now you have successfully repair efs. On / Off mode will be appear again.  This method is personally tested on Samsung Galaxy Tab 2 , success rate was 100% . Work like charm. 
For reference see image below. 

Tutorial samsung galaxy tab


Samsung Galaxy Tab samsung smartphones
ON/OFF Menu Appear 
Samsung Galaxy Tab samsung smartphones
No Yellow Text found


Available link for download

Read more »
Monday, March 27, 2017

How to Set Password on ZTE Nubia Z5S Nubia Z5S Mini

How to Set Password on ZTE Nubia Z5S Nubia Z5S Mini


This post leads you to set a new password on your ZTE Nubia Z5S/Nubia Z5S Mini phone step by step.


Step 1: Go to Settings.


Step 2: Find and enter Security.


Step 3: Choose Screen lock to select a screen lock.


Step 4: Select Password from the provided options.


Step 5: Set up a password and tap Continue.


Please remember that the code should contain at least 4 characters, including at least 1 letter.


Step 6: Re-enter the code and click OK.


After setting a password in your phone, you should keep it firmly in your mind to avoid any inconvenience.


Related Articles:
  • How to Set Password on ZTE Nubia Z5/Nubia Z5 Mini
  • How to Enable USB Debugging in ZTE Grand S II LTE
  • Android USB Drivers for ZTE
  • Recover All Deleted Text Messages on ZTE Blade V-series Android


Available link for download

Read more »
Sunday, March 26, 2017

How to Set Password on Moto XT681

How to Set Password on Moto XT681


The steps to set a password on Moto XT681 phone are as below.


Step 1: Enter Settings.


Step 2: Find and open Location and security.


Step 3: Click Screen lock.


Step 4: Select Password from the screen locks.


Step 5: Input at least 4 characters to be the password and click Continue when finished.


Step 6: Re-input the code and tap OK to complete the setting.


Are these procedures easy to be understood and followed for you?


Related Articles:
How to Turn on USB Debugging in Moto E
Motorola USB Drivers for Android Phones
How to Retrieve Deleted Phone Contacts from Motorola Moto G Android


Available link for download

Read more »

Saturday, March 25, 2017

How to Set Pattern Lock on HTC One M8

How to Set Pattern Lock on HTC One M8


Will you be pleasant when anyone else picks up your HTC One M8 phone and plays games, views text messages and checks other content without asking your permission? Your answer is, of course, a big “No”. To indirectly tell others not to use your phone without your agreement, just set a pattern lock to your phone, following the 6 steps introduced below.


Step 1: Open Settings in the phone.


Step 2: Find and select Security.


Step 3: Choose Screen lock to move on.


Step 4: Select Pattern from the screen lock options.


Step 5: Draw a pattern which connects at least 4 dots, and click CONTINUE when it is recorded.


Step 6: Re-draw the pattern and tap CONFIRM.


Later, the right pattern must be drawn to unlock your locked phone.


Related Articles:
  • How to Set Password on HTC One M8
  • How to Set Password on HTC One M7
  • Android USB Drivers for HTC
  • Restore Deleted SMS on HTC One Mini Android Phone


Available link for download

Read more »

Friday, March 24, 2017

How to Set Password on Samsung ATIV S GT I8750

How to Set Password on Samsung ATIV S GT I8750


With Windows Phone 8 system, 4.8-inch screen and many other advantageous configurations, Samsung ATIV S GT-I8750 phone has enjoyed great popularity among customers. However, a number of users have no idea how to set a password to it. Therefore, the steps to set a password on Samsung GT-I8750 are introduced below.


Step 1: Swipe left on the screen to open a menu of all apps.


Step 2: Swipe up on the menu and click Settings.


Step 3: Choose Lock screen.


Step 4: Find Password option and move the slider to right so as to turn it on.


Step 5: Enter a password, reenter it and tap Finishin the next interface.


After these steps, whenever the phone screen is locked, you need to swipe up to unlock the screen first, and then input the password created to access the Start screen.


Related Articles:
How to Set Password on Samsung Trend II I739
How to Set Password on Samsung S5380/S5380I
How to Open USB Debugging in Samsung Galaxy S5
Android USB Driver for Samsung


Available link for download

Read more »

How to Set Password on Motorola Droid Razr Maxx HD

How to Set Password on Motorola Droid Razr Maxx HD


Following the steps below, you will find that setting a password on your Motorola Droid Razr Maxx HD phone is just a piece of cake.


Step 1: Swipe right on the home screen.


Step 2: Choose Phone lock in “Quick settings”.


Step 3: Under “Security & Screen lock”, select Screen lock to go on.


Step 4: Choose Password from the menu of screen lock.


Step 5: Set a password according to the prompts.


Tip: Make sure the password you create contains at least four characters, including one letter at least.


Related Articles:
  • How to Set Password on Moto E
  • How to Set Password on Moto G
  • How to Set Password on Moto XT681
  • How to Set Password on Moto XT928
  • Motorola USB Drivers for Android Phones


Available link for download

Read more »

Wednesday, March 22, 2017

Indicator Systemtray Unity On Demand System Tray For Ubuntu

Indicator Systemtray Unity On Demand System Tray For Ubuntu


If you still need a system tray in Ubuntu (Unity), you dont need the patched Unity any more. Instead, you can simply install `Indicator Systemtray Unity`, a new AppIndicator which adds a system tray to the Unity panel.

`Indicator Systemtray Unity` doesnt show up on the panel until you launch an application which comes with a tray icon. Even then, the systray is displayed on demand (on left/middle-click) and there are two modes available:

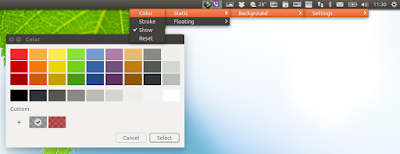
1. Floating mode - in this case, the tray icons will be displayed under it:


When using this mode, youll need to left-click on the Indicator Systemtray Unity icon to show the tray icons, which are only displayed when the mouse cursor is near the Indicator Systemtray icon.


2. Static mode - the icons will be displayed on the panel, on the same raw as the indicators:


By middle-clicking on the Indicator Systemtray icon, you can get the systray icons to be displayed in an overlay on top of the panel, useful to either display the icons next to the indicators (like in my screenshot below) or for use on top of a dock.

When this mode is used, the system tray icons arent hidden (until you middle-click it again).

You can move the icons horizontally by scrolling on the Indicator Systemtray icon on the Unity panel. Moving the icons to the left of the indicators like in the screenshot above is a bit tricky because once the icons are on top of Indicator Systemtray, you wont be able to scroll on it any more, but you can change this via dconf-editor (see below).

Update: you can now change background for both indicator modes. However, to be able to access the background settings from the indicator menu, you need to set Indicator Systemtray Unity to the floating mode (mode 1 above):


Indicator Systemtray can be configured via dconf-editor. Firstly, install dconf-editor:
sudo apt-get install dconf-editor
And then launch Dconf-Editor and navigate to net > launchpad > indicator > systemtray. Here you can change the indicators X and Y positions for the static and floating modes, change the mode, background settings, or disable the indicator.

Note that if you use multiple monitors, the tray will only show up on the primary monitor!


Install Indicator Systemtray Unity in Ubuntu


To install Indicator Systemtray Unity in Ubuntu 15.04, 14.10 or 14.04, use the following commands:
sudo apt-add-repository ppa:fixnix/indicator-systemtray-unity
sudo apt-get update
sudo apt-get install indicator-systemtray-unity
Or, if you dont want to add the PPA, you can grab the deb from HERE (but you wont receive any updates).

Once installed, log out and log in and Indicator Systemtray Unity should start automatically (but it wont show up on the panel until you launch an app that uses a tray icon).

In case you want to remove Indicator Systemtray Unity, use the following command (dont use a simple "remove" because it wont remove the app files from /etc !):
sudo apt-get purge indicator-systemtray-unity
To report bugs, download the source code, etc., see Indicator Systemtray Unitys GitHub page.


Available link for download

Read more »

Tuesday, March 21, 2017

Install PACMan ROM on AT T Galaxy S2 SGH i777 Jelly Bean Custom ROM

Install PACMan ROM on AT T Galaxy S2 SGH i777 Jelly Bean Custom ROM


How to Flash/Install PACMan ROM on AT&T Galaxy S2 SGH-i777 Jelly Bean Custom ROM/Firmware. PACMan ROM is a mixture of CM10.1, AOKP and Paranoid Android ROMs. All the best features of these three ROMs together in one single ROM. This Tutorial will guide you on How to Install PACMan ROM on AT&T Galaxy S2 SGH-i777 Jelly Bean Custom ROM. I have written some of the important tips below that you have to keep in mind before proceeding towards the installation.
ATT-galaxy-s2-i777
Disclaimer: All the custom ROMs and firmwares, official software updates, tools, mods or anything mentioned in the tutorial belong to their respective owners/developers. We or the developers are not to be held responsible if you damage or brick your device. Proceed at your own risk.
Important Tips:
  • Make sure your Galaxy S is rooted and have ClockworkMod Recovery installed -> How to Root and Install ClockworkMod Recovery on Galaxy S2 I9000.
  • This Tutorial for flashing Tsunami X is only for Galaxy S GT-I9000, don’t try this on any other variants of Galaxy S GT-I9000.
  • Charge your battery up to 70%.
  • Make sure USB Debugging is enabled.
  • This installation will wipe your data. Make sure to backup your phone data:
  • Install Galaxy S2 SGH-i777 USB drivers -> Download USB Drivers for Galaxy S2 SGH-i777
I have written this detailed and easy to understand step-by-step instructions guide on How to Install PACMan ROM on AT&T Galaxy S2 SGH-i777 Jelly Bean 4.2.2 Custom ROM. If you are used to flashing custom roms on your device, then this should not be any different for you. However, for beginners, it is recommended that you read the whole tutorial before flashing this Custom Rom.

How to Install PACMan ROM on AT&T Galaxy S2 SGH-i777 Jelly Bean Custom ROM:

Required File(s):
  • Download PACMan ROM (PAC i777 20.0.0 IconRunner.zip)
Step 1 – Download the required files mentioned above  for Galaxy S to your computer.
Step 2 – Connect and mount your Galaxy S2 USB memory on your computer using the USB cable.
Step 3 – Now copy/paste the downloaded PAC i777 20.0.0 IconRunner.zip and Google Apps zip files to your SD card. Make sure the files are in the SD card root (not in any folder).
Step 4 – Then turn OFF your phone and disconnect from the USB cable.
Step 5 – Now to get in the Recovery Mode. Switch ON the phone while pressing and holding Volume Up + Home + Power buttons together.
Reboot-System-Clockwork
NOTE: Screenshots of the ClockworkMod Recovery may change as new versions are released.
Step 6 – Once you are in ClockworkMod Recovery, select perform a full data wipe by selecting “wipe data/factory reset” as shown below. Use the Power button to select everything while in the Recovery Mode.
Wipe-Data-ClockworkMod
Step 7 – Then, perform a cache wipe by selecting “wipe cache partition” as you can see in the image below.
Wipe-Cache-ClockworkMod
Step 8 – Now this is optional, but it is recommended to perform a wipe of your dalvik cache as well. You will not get into boot loops or any other errors. From CWM recovery, go to ‘advanced’ and then select “wipe dalvik cache”.
Wipe-Dalvik-Cache-ClockworkMod
Step 9 – Then go back to the main recovery screen and select “install zip from SD card”.
Install-zip-from-sdcard-ClockworkMod
Step 10 – Now select “choose zip from sdcard”. Using your volume keys, navigate to the PAC i777 20.0.0 IconRunner.zip file that you copied to your SD card and select it using the Power button. Confirm the installation on the next screen and the installation procedure should start now.
Choose-zip-from-sdcard-ClockworkMod
Google Apps: Repeat the above step for the Gapps zip file as well and install it on your phone.
Step 11 – After the installation completes, go to “+++++Go Back+++++” and reboot the phone by selecting “reboot system now” from the recovery menu as show below.
Reboot-System-Clockwork
Your AT&T Galaxy S2 SGH-i777 will boot now and it might take about 5 minutes to boot on your first time. So, please wait.


Available link for download

Read more »

How to Set Password on ZTE V5

How to Set Password on ZTE V5


A password is compared to a security lock, which can effectively help you prevent other people from directly using your phone without your allowance. Thus, it is indispensable and sensible for you to learn how to set a password on your ZTE V5 phone, following the steps below.


Step 1: Open Settings.


Step 2: Locate and enter Security and location.


Step 3: Click Set screen lock to move on.


Step 4: Choose Password in the options listed.


Step 5: Set up your ideal password and tap Continue.


During this step, you should make sure that the code must contain at least 4 characters, including 1 letter at least.


Step 6: Re-enter the password and click OK when finished.


Related Articles:
  • How to Enable USB Debugging in ZTE Grand S II LTE
  • Android USB Drivers for ZTE
  • Recover All Deleted Text Messages on ZTE Blade V-series Android
  • How to Set Password on ZTE Nubia X6
  • How to Set Password on ZTE V880


Available link for download

Read more »

Saturday, March 18, 2017

How to Set Password on ZTE Nubia Z5 Nubia Z5 Mini

How to Set Password on ZTE Nubia Z5 Nubia Z5 Mini


You are capable of setting a password to your ZTE Nubia Z5/Nubia Z5 Mini phone according to the following procedures.


1. Open Settings and enter Security.


2. Select Screen lock to go on.


3. Choose Password from all screen lock options.


4. Choose at least 4 characters on the keyboard to form the password and tap Continuewhen done.


5. Re-type the code and click OK when finished.

After these five procedures, your phone will be secured with the password. In other words, anyone who intends to access your phone will be requested to enter the correct password.


Related Articles:
  • Android USB Drivers for ZTE
  • How to Enable USB Debugging in ZTE Grand S II LTE
  • Recover All Deleted Text Messages on ZTE Blade V-series Android


Available link for download

Read more »

Saturday, March 11, 2017

Install JellyBean On HTC Explorer A310E Pico JellySlash CM10

Install JellyBean On HTC Explorer A310E Pico JellySlash CM10


How To Install JellyBean CM10 On HTC Explorer A310E Pico [JellySlash]


HTC Explorer is a great entry level budget android phone with loads of stuff. Thanks to the mighty HTC hardware this little device can power even the jellybean with a 600MHz CPU.

Before Starting: You Can Also Check-

1. Root HTC Explorer A310E
2. Install CWM Recovery on HTC Explorer
3. Install ICS On HTC Explorer using CyanogenMod9

HTC Explorer can really handle the ROM without much lags or any sort of disturbances.

Warning:

Instructions: Must Read 

Before Installing The ROM You have To Install CWM Recovery. It can be done only after rooting your phone. Backup all your Data since installing new rom will erase phone data.
We arent responsible for any damage happened to your phone. Rooting can Void Warranty. Dont try this guide if you have no idea about rooting or any of the mentioned procedures.


Before Starting:

1. Root Your Phone + Unlock bootloader. Click here for procedure. 
2. You have to install A CWM recovery.- Click here
3. Make sure you have atleast 65% of battery charge to spare.
4. Download The .zip ROM from source-Download
5. You wont get Google Apps in this Rom, so you have to get the zip for Gapps installation. Download them for CM10.

Lets Start:


1. Download .zip ROM file and kernel file from the link.
2. Connect your phone to PC using USB cable- dont forget to enable USB debugging 

3. Copy both files to the external memory. Don’t extract them. ( Its better to place files on SD). If you want you can place the GApps in phone, copy the files also.

4. Disconnect mobile from PC and Turn it off by long pressing power button.
5. Enter into the bootloader mode. To enter into bootloader mode, Hold Volume Down + Power Button simultaneously until bootloader mode appears.
6. In bootloader menu navigate using volume keys and highlight recovery and enter into recovery mode by pressing Power button. You will now reach Custom recovery.
7. Now wipe "data/factory reset" and then " wipe cache partition " to wipe all the data and caches respectively on the phone.
8. Now lets Flash the ROM. Select install zip from sdcard and then choose zip from sdcard. Then select the CyanogenMod 10 file and install.
9. The installation takes some time to finish. 
Note: If you want to install GAPPS then repeat the step of install zip from sdcard and chose zip from sdcard. But this time chose Gapps package.


10. After successful flashing of both the files, select  +++++Go back+++++  and then reboot system now. Normally the first boot takes quite a lot of time. Please be patient. 


You have successfully Installed Jellybean On HTC Explorer Pico using CM10.


Available link for download

Read more »

Monday, February 27, 2017

How to Set Password on ZTE Nubia X6

How to Set Password on ZTE Nubia X6


Setting a password to your ZTE Nubia X6 phone is a wise option since it will protect the significant phone data for you. As for how to realize it, you can refer to the following procedures.


1. Open Settings.


2. Find and click Security and location.


3. Choose Screen lock.


4. Select Password among the options.


5. Input an at least 4-digit code, and tap Continue when done.


6. Re-input the password and click OK when finished.


Related Articles:
  • Android USB Drivers for ZTE
  • How to Enable USB Debugging in ZTE Grand S II LTE
  • How to Set Password on ZTE Nubia Z5/Nubia Z5 Mini
  • How to Set Password on ZTE Nubia Z5S/Nubia Z5S Mini
  • Recover All Deleted Text Messages on ZTE Blade V-series Android


Available link for download

Read more »

Sunday, February 26, 2017

Install Android Lollipop On Mi3

Install Android Lollipop On Mi3


Install Android Lollipop On Mi3

INSTALL ANDROID LOLLIPOP ON MI3 [EASILY EXPLAINED].


Hello, All the mi3 users.There is a good news for all you guys who want to experience Android Lollipop on their phones. Android L has been launched for your phones [UNOFFICIAL] which means you have to flash a custom rom for that.

Disclaimer :

/* Your warranty is now void.
*

* I am not responsible for bricked devices, dead SD cards,

* thermonuclear war, or you getting fired because the alarm app failed. Please

* do some research if you have any concerns about features included in this ROM

* before flashing it! YOU are choosing to make these modifications, and if

* you point the finger at me for messing up your device, I will laugh at you.
*/

OBJECTIVES:-

1. How to flash the Android L custom rom on your Xiaomi mi3.

2. How to root your phone.

 Objective 1--
Things required-

1. CWM Recovery (http://goo.gl/NQPMM0 ==>Download and use R8 zip only

2. Lollipop custom rom ( http://d-h.st/wVrG )

3. Lollipop  Gapps ( http://goo.gl/fkt3XM)

NOTE -
Before getting started I want to warn you that there are some of the bugs present in this rom.
List of  "BUGS" :-
1. NFC is not working.
 (Fix==> It doesnt have any fix till now. sorry )

2. There are Random Auto Reboot
 (Fix==> Install an app called Wake Lock from play store and set it to PARTIAL_WAKE_LOCK. This will prevent the device from deep sleep and fix Random Reboots )

3. Camcorder is not able to save videos
 (Fix==> Use any Third party camera from play store for this like Camera Next).

4. Screen turns ON if menu or back button is touched. 
(Fix==>You can disable the buttons and use Navigation Bar)


Available link for download

Read more »