Showing posts with label set. Show all posts
Showing posts with label set. Show all posts
Monday, March 27, 2017
How to Set Password on ZTE Nubia Z5S Nubia Z5S Mini
How to Set Password on ZTE Nubia Z5S Nubia Z5S Mini
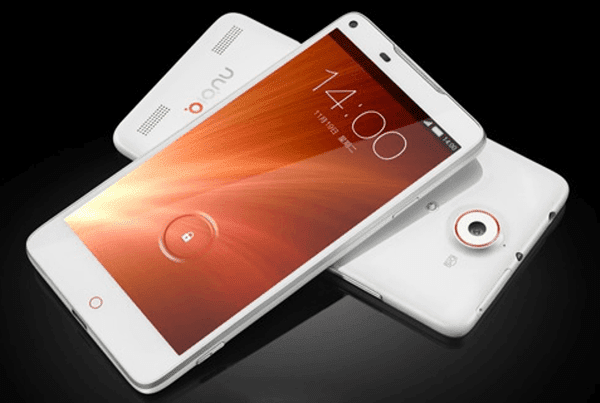
This post leads you to set a new password on your ZTE Nubia Z5S/Nubia Z5S Mini phone step by step.
Step 1: Go to Settings.
Step 2: Find and enter Security.
Step 3: Choose Screen lock to select a screen lock.
Step 4: Select Password from the provided options.
Step 5: Set up a password and tap Continue.
Please remember that the code should contain at least 4 characters, including at least 1 letter.
Step 6: Re-enter the code and click OK.
Related Articles:
- How to Set Password on ZTE Nubia Z5/Nubia Z5 Mini
- How to Enable USB Debugging in ZTE Grand S II LTE
- Android USB Drivers for ZTE
- Recover All Deleted Text Messages on ZTE Blade V-series Android
Available link for download
Sunday, March 26, 2017
How to Set Password on Moto XT681
How to Set Password on Moto XT681
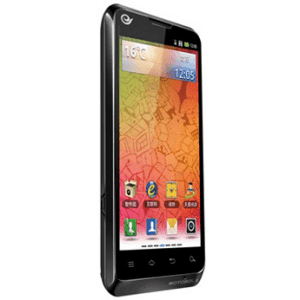
The steps to set a password on Moto XT681 phone are as below.
Step 1: Enter Settings.
Step 2: Find and open Location and security.
Step 3: Click Screen lock.
Step 4: Select Password from the screen locks.
Step 5: Input at least 4 characters to be the password and click Continue when finished.
Step 6: Re-input the code and tap OK to complete the setting.
Related Articles:
How to Turn on USB Debugging in Moto E
Motorola USB Drivers for Android Phones
How to Retrieve Deleted Phone Contacts from Motorola Moto G Android
Available link for download
Saturday, March 25, 2017
How to Set Pattern Lock on HTC One M8
How to Set Pattern Lock on HTC One M8
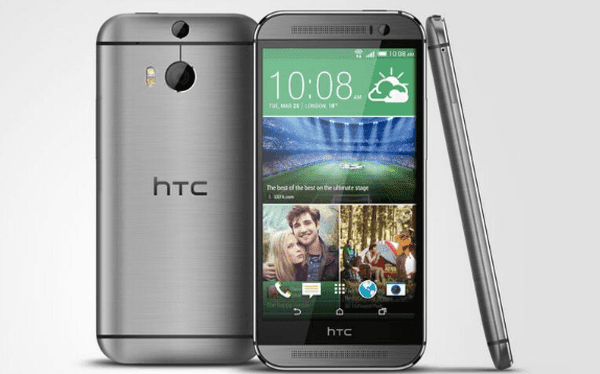
Will you be pleasant when anyone else picks up your HTC One M8 phone and plays games, views text messages and checks other content without asking your permission? Your answer is, of course, a big “No”. To indirectly tell others not to use your phone without your agreement, just set a pattern lock to your phone, following the 6 steps introduced below.
Step 1: Open Settings in the phone.
Step 2: Find and select Security.
Step 3: Choose Screen lock to move on.
Step 4: Select Pattern from the screen lock options.
Step 5: Draw a pattern which connects at least 4 dots, and click CONTINUE when it is recorded.
Step 6: Re-draw the pattern and tap CONFIRM.
Related Articles:
- How to Set Password on HTC One M8
- How to Set Password on HTC One M7
- Android USB Drivers for HTC
- Restore Deleted SMS on HTC One Mini Android Phone
Available link for download
Friday, March 24, 2017
How to Set Password on Samsung ATIV S GT I8750
How to Set Password on Samsung ATIV S GT I8750

With Windows Phone 8 system, 4.8-inch screen and many other advantageous configurations, Samsung ATIV S GT-I8750 phone has enjoyed great popularity among customers. However, a number of users have no idea how to set a password to it. Therefore, the steps to set a password on Samsung GT-I8750 are introduced below.
Step 1: Swipe left on the screen to open a menu of all apps.
Step 2: Swipe up on the menu and click Settings.
Step 3: Choose Lock screen.
Step 4: Find Password option and move the slider to right so as to turn it on.
Step 5: Enter a password, reenter it and tap Finishin the next interface.
Related Articles:
How to Set Password on Samsung Trend II I739
How to Set Password on Samsung S5380/S5380I
How to Open USB Debugging in Samsung Galaxy S5
Android USB Driver for Samsung
Available link for download
How to Set Password on Motorola Droid Razr Maxx HD
How to Set Password on Motorola Droid Razr Maxx HD
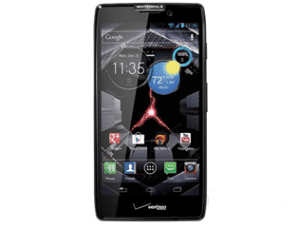
Following the steps below, you will find that setting a password on your Motorola Droid Razr Maxx HD phone is just a piece of cake.
Step 1: Swipe right on the home screen.
Step 2: Choose Phone lock in “Quick settings”.
Step 3: Under “Security & Screen lock”, select Screen lock to go on.
Step 4: Choose Password from the menu of screen lock.
Step 5: Set a password according to the prompts.
Tip: Make sure the password you create contains at least four characters, including one letter at least.
Related Articles:
- How to Set Password on Moto E
- How to Set Password on Moto G
- How to Set Password on Moto XT681
- How to Set Password on Moto XT928
- Motorola USB Drivers for Android Phones
Available link for download
Tuesday, March 21, 2017
How to Set Password on ZTE V5
How to Set Password on ZTE V5

A password is compared to a security lock, which can effectively help you prevent other people from directly using your phone without your allowance. Thus, it is indispensable and sensible for you to learn how to set a password on your ZTE V5 phone, following the steps below.
Step 1: Open Settings.
Step 2: Locate and enter Security and location.
Step 3: Click Set screen lock to move on.
Step 4: Choose Password in the options listed.
Step 5: Set up your ideal password and tap Continue.
During this step, you should make sure that the code must contain at least 4 characters, including 1 letter at least.
Step 6: Re-enter the password and click OK when finished.
Related Articles:
Step 6: Re-enter the password and click OK when finished.
Related Articles:
- How to Enable USB Debugging in ZTE Grand S II LTE
- Android USB Drivers for ZTE
- Recover All Deleted Text Messages on ZTE Blade V-series Android
- How to Set Password on ZTE Nubia X6
- How to Set Password on ZTE V880
Available link for download
Saturday, March 18, 2017
How to Set Password on ZTE Nubia Z5 Nubia Z5 Mini
How to Set Password on ZTE Nubia Z5 Nubia Z5 Mini

You are capable of setting a password to your ZTE Nubia Z5/Nubia Z5 Mini phone according to the following procedures.
1. Open Settings and enter Security.
2. Select Screen lock to go on.
3. Choose Password from all screen lock options.
4. Choose at least 4 characters on the keyboard to form the password and tap Continuewhen done.
5. Re-type the code and click OK when finished.
Related Articles:
- Android USB Drivers for ZTE
- How to Enable USB Debugging in ZTE Grand S II LTE
- Recover All Deleted Text Messages on ZTE Blade V-series Android
Available link for download
Monday, February 27, 2017
How to Set Password on ZTE Nubia X6
How to Set Password on ZTE Nubia X6

Setting a password to your ZTE Nubia X6 phone is a wise option since it will protect the significant phone data for you. As for how to realize it, you can refer to the following procedures.
1. Open Settings.
2. Find and click Security and location.
3. Choose Screen lock.
4. Select Password among the options.
5. Input an at least 4-digit code, and tap Continue when done.
6. Re-input the password and click OK when finished.
Related Articles:
Related Articles:
- Android USB Drivers for ZTE
- How to Enable USB Debugging in ZTE Grand S II LTE
- How to Set Password on ZTE Nubia Z5/Nubia Z5 Mini
- How to Set Password on ZTE Nubia Z5S/Nubia Z5S Mini
- Recover All Deleted Text Messages on ZTE Blade V-series Android
Available link for download
Saturday, February 11, 2017
How to Set Pattern Lock on Samsung Galaxy Gio GT S5660
How to Set Pattern Lock on Samsung Galaxy Gio GT S5660

Almost every day, you can see people around you draw diversified patterns on the phone screens to unlock their phones. If you haven’t set a pattern lock on your Samsung Galaxy Gio GT-S5660 phone, your curiosity for the method to set it by yourself will definitely be aroused. Hence, this post illustrates the detailed steps for your reference.
Steps to set a pattern lock on Samsung Galaxy Gio GT-S5660:
Step 1: Open Settings in the phone.
Step 2: Find and access Location and security.
Step 3: Locate and click Set screen lock.
Step 4: Choose Pattern to move on.
Step 5: Draw a pattern and tap Continue. Meanwhile, please note that the pattern must connect at least 4 dots.
Step 6: Draw the pattern again and click Confirm.
Related Articles:
How to Create A PIN Lock for Samsung Galaxy Gio GT-S5660
How to Set Password on Samsung GT-I8190N
How to Set Password on Samsung GT-I8268
Android USB Driver for Samsung
Available link for download
How to Set Password on Samsung Galaxy S3 I9300 I9308
How to Set Password on Samsung Galaxy S3 I9300 I9308

“Hi, guys. I want to set a password to lock the screen of my Samsung galaxy s3 i9300 phone, but I don’t know how to make it. So please kindly tell me the concrete method asap.”
To set password on Samsung Galaxy S3 I9300/I9308, you can follow the steps below.
Step 1: Open Apps and enter Settings.
Step 2: Choose Security to move on.
Step 3: Select Screen lock.
Step 4: Choose Password to go on.
Step 5: Type a password and click Continue.
FYI, the password must contain at least 4 characters, at least 1 letter included.
Related Articles:
Android USB Driver for Samsung
How to Enable and Disable USB Debugging in Samsung GALAXY Tab2
How to Set Password on Samsung GT-I8190N
How to Set Password on Galaxy S4 GT-I9500/GT-I9508
Available link for download
Sunday, February 5, 2017
How to Set Password on Samsung GT S7562 GT S7562I
How to Set Password on Samsung GT S7562 GT S7562I

The following steps can effectively assist you to set a password on your Samsung GT-S7562/GT-S7562I phone.
Step 1: Click Apps.
Step 2: Open Settings.
Step 3: Choose Security to go on.
Step 4: Tap Scree lock.
Step 5: Select Password.
Step 6: Input your desired password and click Continue.
Note: The password must possess at least 4 characters, including at least 1 letter.
Step 7: Re-input the password and tap OK.
Related Articles:
Android USB Driver for Samsung
How to Set Password on Samsung S5380/S5380I
How to Set Password on Samsung I9082/I9082I
How to Set Password on Samsung Galaxy S3 I9300/I9308
How to Set Password on Galaxy S4 GT-I9500/GT-I9508
Available link for download
Saturday, January 28, 2017
How to Set Password on Samsung GT I8190N
How to Set Password on Samsung GT I8190N

The following steps can help you efficiently set a password on your Samsung GT-I8190N phone.
Step 1: Click Apps on the phone screen.
Step 2: Select Settings.
Step 3: Tap Lock screen.
Step 4: Choose Screen lock.
Step 5: Select Password in the screen lock options.
Step 6: Enter a password composed of at least 4 characters and click Continue.
FYR, the password must contain at least 1 letter.
Related Articles:
How to Set Password on Samsung Galaxy S GT-I9000
How to Set Password on Samsung Galaxy S2 I9100
How to Set Password on Samsung Galaxy S3 I9300/I9308
Android USB Driver for Samsung
Available link for download
Wednesday, January 25, 2017
How to Set Password on Sony Xperia Z2
How to Set Password on Sony Xperia Z2

Setting a password on Sony Xperia Z2 phone can be realized through the steps below.
Step 1: Open Settings.
FYI, you can open it by either of the following two methods.
1. Swipe down on the home screen, click “Quick settings” and choose “Settings”.
2. Click the middle icon at the bottom and select “Settings”.
Step 2: Get into Security.
Step 3: Choose Screen lock.
Step 4: Select Password in the options listed.
Step 5: Input at least four characters to be a password and tap Continue.
Step 6: Re-input the code and click OK to confirm it.
After finishing the sixth step, the password has been successfully set to protect the Sony Xperia Z2 phone.
Related Articles:
After finishing the sixth step, the password has been successfully set to protect the Sony Xperia Z2 phone.
Related Articles:
- Android USB Drivers for Sony
- How to Set Password on Sony Xperia Z1
- How to Set Password on Sony Xperia Z L36h
- How to Set Password on Sony LT26i/LT26ii
Available link for download
Friday, January 13, 2017
How To Set Up AFP File Sharing On Linux for Use With Time Machine
How To Set Up AFP File Sharing On Linux for Use With Time Machine

Preface:
In past versions of Mac OS X, the built in backup tool, Time Machine was a lot less picky about where you back up your files to. You could even back up to a Samba file share if you enabled the "unsupported volumes" hack.
defaults write com.apple.systempreferences TMShowUnsupportedNetworkVolumes 1
But that ended with Snow Leopard. Starting with the release of OSX 10.7 Lion, Apple started cinching down on where you could back up your system to, ostensibly for security reasons. Now, with Mac OS X 10.8 "Mountain Lion", its gotten to the point where essentially the only places you can back up your system using Time Machine are either on another Mac OS X File Server or on an Apple Time Capsule. My assumption is that their intent is merely to bolster their hardware sales.
I dont know too many people who stay exclusively within the "walled garden" for all their computing needs. Certainly people with a lot more money to burn than me. But for a much more economical approach than shelling out around $300 for an over-glorified USB drive, you could just follow this guide to set up your Ubuntu file server to look and behave exactly like Time Machine would expect a real Time Capsule or Mac to.
Step 1: Install Netatalk
installing Netatalk, the open source Apple Filing Protocol (AFP) implementation is easy! The packages are already in the repos, which makes me wonder why its not enabled by default.
Install the following packages:
sudo apt-get install netatalk libc6-dev avahi-daemon libnss-mdns
Step 2: Configure /etc/nsswitch.conf
Once those packages are installed, there are actually five configuration files that need to be edited in order for the Macs on your network to access your AFP shares properly.
sudo nano /etc/nsswitch.conf
locate the line that reads
hosts: files mdns4_minimal [NOTFOUND=return] dns mdns4
and add mdns to it so it now reads
hosts: files mdns4_minimal [NOTFOUND=return] dns mdns4 mdns
press ctrl+o to save and ctrl+x to exit.
Step 3: /etc/avahi/services/afpd.service
sudo nano /etc/avahi/services/afpd.service
paste the following code
<?xml version="1.0" standalone=no?><!--*-nxml-*-->
<!DOCTYPE service-group SYSTEM "avahi-service.dtd">
<service-group>
<name replace-wildcards="yes">%h</name>
<service>
<type>_afpovertcp._tcp</type>
<port>548</port>
</service>
<service>
<type>_device-info._tcp</type>
<port>0</port>
<txt-record>model=TimeCapsule</txt-record>
</service>
</service-group>
NOTE: Just for fun you can change the string "<txt-record>model=TimeCapsule</txt-record>" to the following devices to change how they appear in Finder on OSX:
| Image | Apple Product | Identifier Strings |
 | Airport Express | AirPort4 AirPort4,102 AirPort4,107 |
 | Airport Extreme | AirPort Airpor5 AirPort5,104 AirPort5,105 AirPort5,108 AirPort5,114 AirPort5,117 |
 | Aluminum 20” iMac | iMac7,1 iMac8,1 |
 | Aluminum 24” iMac | iMac9,1 |
 | Aluminum Unibody MacBook | MacBook5,1 |
 | Apple Cinema Display | Any invalid or blank string |
 | AppleTV | AppleTV AppleTV1,1 |
 | Black MacBook | MacBook1,1,Black MacBook2,1,Black MacBook3,1,Black MacBook4,1,Black |
 | eMac | PowerMac4,4 PowerMac6,4 |
 | Flower Pot G4 iMac 15” | PowerMac4,2 |
 | Flower Pot G4 iMac 17” | PowerMac4,5 PowerMac6,1 |
 | Flower Pot G4 iMac 20” | PowerMac6,3 |
 | Graphite G4 PowerMac | PowerMac |
Available link for download
Read more »
Thursday, January 12, 2017How to Set Password on Samsung Galaxy Note 10 1 P600 P601How to Set Password on Samsung Galaxy Note 10 1 P600 P601 To set a password to secure your Samsung Galaxy Note 10.1 P600/P601, you can follow the steps below. Step 1: Click the Apps icon on the bottom right corner. Step 2: Select Settings in the Apps interface. Step 3: Choose Device on the top left. Step 4: Tap Lock screen and choose Screen lock in the sub menu. Step 5: Select Password to move on. Step 6: Input a password (at least 4 characters, including at least 1 letter), and click Continue. Step 7: Type the password again and tap OK. Related Articles: How to Set Password on Samsung ATIV S GT-I8750 How to Set Password on Galaxy S4 GT-I9500/GT-I9508 How to Enable and Disable USB Debugging in Samsung GALAXY Tab2 How to Open USB Debugging in Samsung Galaxy S5 Android USB Drivers for Samsung Available link for download
Subscribe to:
Posts (Atom)
|