Friday, January 13, 2017
How To Set Up AFP File Sharing On Linux for Use With Time Machine
How To Set Up AFP File Sharing On Linux for Use With Time Machine

Preface:
In past versions of Mac OS X, the built in backup tool, Time Machine was a lot less picky about where you back up your files to. You could even back up to a Samba file share if you enabled the "unsupported volumes" hack.
defaults write com.apple.systempreferences TMShowUnsupportedNetworkVolumes 1
But that ended with Snow Leopard. Starting with the release of OSX 10.7 Lion, Apple started cinching down on where you could back up your system to, ostensibly for security reasons. Now, with Mac OS X 10.8 "Mountain Lion", its gotten to the point where essentially the only places you can back up your system using Time Machine are either on another Mac OS X File Server or on an Apple Time Capsule. My assumption is that their intent is merely to bolster their hardware sales.
I dont know too many people who stay exclusively within the "walled garden" for all their computing needs. Certainly people with a lot more money to burn than me. But for a much more economical approach than shelling out around $300 for an over-glorified USB drive, you could just follow this guide to set up your Ubuntu file server to look and behave exactly like Time Machine would expect a real Time Capsule or Mac to.
Step 1: Install Netatalk
installing Netatalk, the open source Apple Filing Protocol (AFP) implementation is easy! The packages are already in the repos, which makes me wonder why its not enabled by default.
Install the following packages:
sudo apt-get install netatalk libc6-dev avahi-daemon libnss-mdns
Step 2: Configure /etc/nsswitch.conf
Once those packages are installed, there are actually five configuration files that need to be edited in order for the Macs on your network to access your AFP shares properly.
sudo nano /etc/nsswitch.conf
locate the line that reads
hosts: files mdns4_minimal [NOTFOUND=return] dns mdns4
and add mdns to it so it now reads
hosts: files mdns4_minimal [NOTFOUND=return] dns mdns4 mdns
press ctrl+o to save and ctrl+x to exit.
Step 3: /etc/avahi/services/afpd.service
sudo nano /etc/avahi/services/afpd.service
paste the following code
<?xml version="1.0" standalone=no?><!--*-nxml-*-->
<!DOCTYPE service-group SYSTEM "avahi-service.dtd">
<service-group>
<name replace-wildcards="yes">%h</name>
<service>
<type>_afpovertcp._tcp</type>
<port>548</port>
</service>
<service>
<type>_device-info._tcp</type>
<port>0</port>
<txt-record>model=TimeCapsule</txt-record>
</service>
</service-group>
NOTE: Just for fun you can change the string "<txt-record>model=TimeCapsule</txt-record>" to the following devices to change how they appear in Finder on OSX:
| Image | Apple Product | Identifier Strings | |||||||||||||||||||||
 | Airport Express | AirPort4 AirPort4,102 AirPort4,107 | |||||||||||||||||||||
 | Airport Extreme | AirPort Airpor5 AirPort5,104 AirPort5,105 AirPort5,108 AirPort5,114 AirPort5,117 | |||||||||||||||||||||
 | Aluminum 20” iMac | iMac7,1 iMac8,1 | |||||||||||||||||||||
 | Aluminum 24” iMac | iMac9,1 | |||||||||||||||||||||
 | Aluminum Unibody MacBook | MacBook5,1 | |||||||||||||||||||||
 | Apple Cinema Display | Any invalid or blank string | |||||||||||||||||||||
 | AppleTV | AppleTV AppleTV1,1 | |||||||||||||||||||||
 | Black MacBook | MacBook1,1,Black MacBook2,1,Black MacBook3,1,Black MacBook4,1,Black | |||||||||||||||||||||
 | eMac | PowerMac4,4 PowerMac6,4 | |||||||||||||||||||||
 | Flower Pot G4 iMac 15” | PowerMac4,2 | |||||||||||||||||||||
 | Flower Pot G4 iMac 17” | PowerMac4,5 PowerMac6,1 | |||||||||||||||||||||
 | Flower Pot G4 iMac 20” | PowerMac6,3 | |||||||||||||||||||||
 | Graphite G4 PowerMac | PowerMac | |||||||||||||||||||||
Available link for download
Read more »
Sunday, January 1, 2017Intex Aqua ACE FRP Google Account Bypass done with Miracle box TestedIntex Aqua ACE FRP Google Account Bypass done with Miracle box TestedBefore use this guide must your device battery charged up to 80%, and also check USB Socket must be working well, also check Micro USB Cable its must be good quality some market cables are not working properly so this is impotent for that, first take backup in your device like contacts, videos, photos, emails, notes etc because this will Factory Reset then you cant save any data this is also impotent for customer, if data in SD Card so dont worry this is not remove but first take out SD Card from the phone after try to following this method If USB not working some hits like USB not recognized this issue make two type first of Micro USB Cable or handset USB Socket not working, Second of if battery low then that error comes on the computer display, some time USB line clear after that USB not working what happen ? here i give you suggest check USB Socket there waste is to be filled clean that after try to connect device will be connected This guide was done in Miracle box, if you following this then must be have Miracle box otherwise option should be in other chines boxes which check below in Miracle box screenshot and also must installed USB driver in your computer or laptop without that you cant connect device with miracle box, you dont have driver you can download from the below link not lets go how to FRP Reset in Intex Aqua ACE ? lets see Required for Intex Aqua ACE
Procedure for Intex Aqua ACE
Intex Aqua ACE Frp Reset Done Screenshot:  Available link for download Thursday, December 29, 2016IDT High Definition HD Audio Driver with Beats Audio for All OSIDT High Definition HD Audio Driver with Beats Audio for All OSIDT High Definition (HD) Audio Driver with Beats Audio for All OS IDT High Definition (HD) Audio Driver with Beats Audio for All OS DESCRIPTION: This package contains the driver that enables the IDT High-Definition (HD) Audio in supported notebook models that are running a supported operating system. HARDWARE PRODUCT MODEL(S): HP EliteBook 840 G1 Notebook PC HP ZBook 14 Mobile Workstation HP EliteBook 740 G1 Notebook PC HP EliteBook 850 G1 Notebook PC HP EliteBook 750 G1 Notebook PC HP EliteBook 820 G1 Notebook PC HP EliteBook 720 G1 Notebook PC HP EliteBook Folio 9470m Notebook PC HP ZBook 15 Mobile Workstation HP ProBook 655 G1 Notebook PC HP ProBook 645 G1 Notebook PC HP EliteBook Revolve 810 G2 G1 HP EliteBook Revolve 810 G1 HP ProBook 650 G1 Notebook PC HP ProBook 640 G1 Notebook PC HP EliteBook Folio 1040 G1 Notebook PC HP ZBook 17 Mobile Workstation And More... OPERATING SYSTEM(S): Microsoft Windows 7 Enterprise 32 Edition Microsoft Windows 7 Home Basic 32 Edition Microsoft Windows 7 Home Basic 64 Edition Microsoft Windows 7 Home Premium 32 Edition Microsoft Windows 7 Home Premium 64 Edition Microsoft Windows 7 Ultimate 32 Edition Microsoft Windows 7 Ultimate 64 Edition Microsoft Windows 8 32 Edition Microsoft Windows 8 Chinese Market 32 Edition Microsoft Windows 8 Chinese Market 64 Edition Microsoft Windows 8 Enterprise 32 Edition Microsoft Windows 8 Multi-Language 64 Edition Microsoft Windows 8.1 32-bit Emerging Markets Microsoft Windows 8.1 32-bit Enterprise Microsoft Windows 8.1 32-bit Multi-Language Microsoft Windows 8.1 32-bit Professional Microsoft Windows 8.1 64-bit Chinese Market Microsoft Windows 8.1 64-bit Emerging Markets Microsoft Windows 8.1 64-bit Enterprise Microsoft Windows 8.1 64-bit Professional Microsoft Windows 7 Enterprise 64 Edition Microsoft Windows 7 Professional 32 Edition Microsoft Windows 7 Professional 64 Edition Microsoft Windows 7 Starter 32 Edition Microsoft Windows 8 64 Edition Microsoft Windows 8 Emerging Markets 32 Edition Microsoft Windows 8 Emerging Markets 64 Edition Microsoft Windows 8 Enterprise 64 Edition Microsoft Windows 8 Multi-Language 32 Edition Microsoft Windows 8 Professional 32 Edition Microsoft Windows 8 Professional 64 Edition Microsoft Windows 8.1 32 Bit Microsoft Windows 8.1 32-bit Chinese Market Microsoft Windows 8.1 64 Bit Microsoft Windows 8.1 64-bit Multi-Language LANGUAGE(S): Global Version: 6.10.6499.0 REV: J PASS: 20 Download Link Available link for download Friday, November 25, 2016HWBOT GIGABYTE X99 SOC Champion Dominates X99 2D Multi threaded Benchmarks with 1 World Record and 5 Global First PlaceHWBOT GIGABYTE X99 SOC Champion Dominates X99 2D Multi threaded Benchmarks with 1 World Record and 5 Global First PlaceHWBOT spotted we’ve been busy with the X99 SOC Champion and taking all the scores down!
Source: HWBOT Author: SDougal Available link for download Thursday, November 17, 2016How to Transfer Domain with GodaddyHow to Transfer Domain with GodaddyA domain transfer is the system of changing the designated registrar of a domain name. The registrar registers domain name of applicants. If applicants were registered their domain name with another registrar, then they dont have to renew your domain with them. They can only transfer the domain to any registrar at any time and anywhere. But you will not be able to change name servers until the domain name has been transferred to your new registrar. To transfer your domain registration to Godaddy then follows the steps, which is given below.  Process of Authorize Domain Name Transfer (Step 1 of 9) Step #1 First Login to your Account Manager. Step #2 Next to the domains name, click "Launch". Step #3 You can select domain from domains menu, and select "Tansfer". Step #4 After completion of 3 step click on the "Authorize Transfer". Step #5 Now click on the "Add now". Step #6 In the "Transaction ID" and "Security Code fields", A transfers ID send to your email address, then you fill the transfer id and click "Add". Step #7 If you select the "Basic tab", then enter the "Authorization Code", and if you select the Advanced tab,then enter one domain name and its authorization code per line. Step #8 Now select I authorize the transfer, and then click on the "Finish". Step #9 At last click "OK". Available link for download Thursday, October 20, 2016Install Android 4 4 KitKat Google Experience Launcher With OK Google Command Enabled Google NowInstall Android 4 4 KitKat Google Experience Launcher With OK Google Command Enabled Google NowThose who have not owned a Nexus 5 or any other nexus device which have stock Android 4.4 KitKat may miss the new stock features a lot. Even we are not much curious about every stock feature, the Android 4.4 KitKat Launcher and the Google Nows OK Google command feature may be in the 1st and 2nd position in our needed features list. By following the post you can get both of them in your non nexus device too. The method works with both rooted and non rooted devices. Currently "OK Google" command will work from the Home screen only.I have tested it with Galaxy S3 GT-I9300 and it works very well. 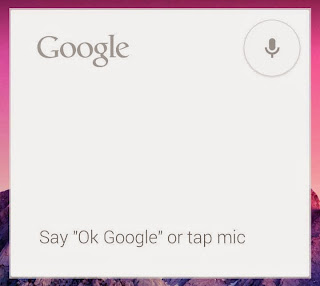 Update: Tested in more devices .... some of them have force close error... so while selecting launcher dont select always select just once. How To Setup Android 4.4 KitKat Launcher ?1. Download and Install Launcher | Latest Google Now2. After Installing both apk ... click Home button and select Launcher in the list. Note: select Just once dont set always...then you can uninstall simply in case force close appears. How To Enable Ok Google Command in Google Now ?To work this method your phones default language should be English US to change default language go to Settings -> Language and input -> language1. In Home Screen go to Google Now settings  2. In Google Now Settings tap on Voice -> Offline speech recognition....it will open Download Languages screen. 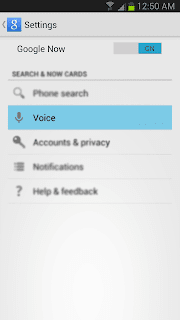 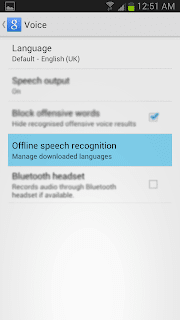 3. In Download Languages activity tap on All tab and select English (US) in the list. 4. Now, You will get a pre installed warning tap OK 5. Go back to INSTALLED tab and tap on English (US) 6. Now, it will ask you to download the latest update tap on Download. 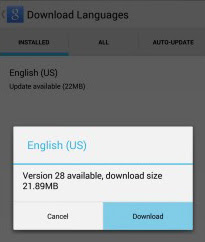 7. After finishing the update....go back to Home screen..where you’ll notice “Ok Google” will now be displayed inside the Google Search widget. Thats it.. Note : If "Ok Google" not showing in the Google search widget tap on the voice icon in the widget then close it.... now try saying OK Google it will work.... Available link for download Sunday, October 16, 2016How to unlock MF825 Bolt with dc unlocker programHow to unlock MF825 Bolt with dc unlocker program
Available link for download Wednesday, October 5, 2016How to Set Up ADB and Fastboot with Android SDK on WindowsHow to Set Up ADB and Fastboot with Android SDK on WindowsHow to Set Up ADB and Fastboot with Android SDK on Windows 7 & Windows 8. Android SDK brings with itself the two most important tools needed for tweaking your Android phone, ADB (Android Debug Bridge) and Fastboot. Why do we need them? ADB and fastboot helps us install a custom recovery, which allows us to root our Android devices, install custom ROMs and perform many other system tweaks which are not otherwise possible. Let’s get on with the tutorial on how to set up ADB and Fastboot for your Android phone so that you never have to go through USB drivers issues again when trying out a custom firmware. How to Set Up ADB and Fastboot with Android SDK on Windows:Here are the step-by-step instructions to set up ADB / Fastboot on your computer. Follow the steps carefully and make sure you read the tutorial once before actually performing it. Required:
Let’s get started with the tutorial: Step 1 – Download and Install Java Platform (JDK) from Java SE Software Development Kit (SDK) downloads. Once installed, proceed to the next step. Step 2 – Download Android SDK (android-sdk_r20.0.1-windows.zip) from the Android Developers website. Preferably: Click on Other platforms and download the ZIP package file for Windows. Step 3 – Extract the zip file anywhere in your computer. We extracted in D: drive. So now we have, D:android-sdk-windows. Step 4 – Open SDK Manager and wait till it loads (fetches) all the packages. Step 5 – Now only select two pakcages. Check Android SDK Platform-tools and Google USB Driver options. Uncheck everything else. Then click on the “Install 2 packages…” button. Step 6 – Confirm the packages that you selected. Select Accept All and click the “Install” button. Step 7 – Wait till the downloading finishes. Step 8 – Once you get the following screen, this means all the packages have been successfully installed. Step 9 – If you again go to the Android SDK folder (D:android-sdk-windows), you will see the following directories now. extras andplatform-tools are the most important ones that we need.  Now that we have all the files, drivers and tools needed. We can proceed on setting up ADB for my Galaxy Nexus. In this part, we will tell you how to use the downloaded USB drivers to set up ADB. NOTE: USB drivers may be different for other Android phones. Step 10 – Make sure USB debugging is enabled on your phone. If you don’t know how to enable USB Debugging then follow these steps:
Step 11 – Connect your Android phone to the computer and wait till your PC installs all the drivers it could. Most of the drivers would fail to install. Step 12 – Go to Start -> Control Panel -> System -> Device Manager. In the list, you will see your phone (it should be in “Other Devices”). Step 13 – Right-click on it, and select Update Driver Software… Step 14 – Select the second option from the following screen. Step 15 – Again, select the second option from the next screen. Step 16 – Select Show All Devices and click Next. Step 17 – Click the “Have Disk” button. Now browse to D:android-sdk-windowsextrasgoogleusb_driver directory and selectandroid_winusb.inf. Click Open. Then click on OK. Step 18 – You will be shown a list of Android drivers. Select Android ADB Interface and click Next. Step 19 – Click Yes to the warning message. Step 20 – Now wait till driver installation gets over. Click the ‘Install’ button if you see the following warning message. Step 21 – If you see the following screen now, Congratulations! ADB drivers are now successfully installed on your computer!  Step 22 – Now to verify ADB is working fine, go to the platform-tools directory (D:android-sdk-windowsplatform-tools). Step 23 – Open Command Prompt. Hold Shift key + right-click anywhere in the folder and select Open command prompt here. Step 24 – Type “adb devices” (without quotes) in the Command Prompt window and press Enter. Step 25 – If you see the screen as in the screenshot below, you have successfully set up ADB on your computer for your Android phone.  ADB is now installed and can be used anytime you want to install tweaks or perform ADB commands. We can proceed on setting up Fastboot for my Galaxy Nexus. In this part, we will tell you how to use the downloaded USB drivers to set up Fastboot. NOTE: Fastboot USB drivers may be different for other Android phones. Bootloader should be unlocked. If you are unsure, Google this up for your phone. Step 26 – Disconnect your Android phone from the USB cable and turn it OFF. Step 27 – Go to Bootloader / Fastboot mode now. To do so, Press and hold these buttons together: Volume Up + Volume Down + Power. Hold them till you see the Bootloader / Fastboot mode. Step 28 – Connect your Android phone to the computer now and wait till your PC installs all the drivers it could. Step 29 – Then, go to Start -> Control Panel -> System -> Device Manager. In the list, you will see Android 1.0. Now Repeat the Process from Step 13 to Step 25 once again and you’re done!! Available link for download
Subscribe to:
Posts (Atom)
|


