Showing posts with label recovery. Show all posts
Showing posts with label recovery. Show all posts
Thursday, December 15, 2016
Infocus M810 ULTIMATE GUIDE ROOTING ROMS FLASHING RECOVERY GUIDE!
Infocus M810 ULTIMATE GUIDE ROOTING ROMS FLASHING RECOVERY GUIDE!
*******************************************************
DO ON YOUR OWN RISK YOUR WARRANTY WILL BE VOID WITH APPLICATION OF ANY OF THE PROCESS
*******************************************************
DO ON YOUR OWN RISK YOUR WARRANTY WILL BE VOID WITH APPLICATION OF ANY OF THE PROCESS
*******************************************************
############
ROOTING
############
ROOTING
############
1. Install kingRoot and root
http://mmgr.myapp.com/…/NewKingrootV4.62_C133_B233_en_relea…
2. Replace Kingroot with Superuser :
http://www.w0lfdroid.com/…/How-to-Remove-Replace-KingUser-K…
#######################
UPGRADING FROM STOCK ROM :
#######################
UPGRADING FROM STOCK ROM :
#######################
-In your PC Download SUT 3.0.8 :
http://www.mediafire.com/d…/k2vcm4p4tbibfbc/SUTLR_v3.0.8.rar
-install SUT (drivers will be installed with SUT);
-keep USB debugging on your phone,
-download zip with nb0 image. Unzip.( 5.1.1C / 5.1.1C )
-open nb0 image file in SUT.
-Check "Normal Download" and "Erase data".
-Download ignore warning messages.
-Flash will complete in less than 1 min.
-keep USB debugging on your phone,
-download zip with nb0 image. Unzip.( 5.1.1C / 5.1.1C )
-open nb0 image file in SUT.
-Check "Normal Download" and "Erase data".
-Download ignore warning messages.
-Flash will complete in less than 1 min.
%%%%%%%
nb0 roms :
%%%%%%%
nb0 roms :
%%%%%%%
*****************
Lollipop 5.1.1B :
*****************
http://www.mediafire.com/…/VNA-511B-0-00WW-A01-rooted-ODEXE…
Lollipop 5.1.1B :
*****************
http://www.mediafire.com/…/VNA-511B-0-00WW-A01-rooted-ODEXE…
****************
Lollipop 5.1.1 C :
****************
https://drive.google.com/…/0B3Wy4Ok3qGszTDZEc2VJS09iSzg/view
Lollipop 5.1.1 C :
****************
https://drive.google.com/…/0B3Wy4Ok3qGszTDZEc2VJS09iSzg/view
##########################
CUSTOM RECOVERY INSTALLATION
##########################
CUSTOM RECOVERY INSTALLATION
##########################
*******************************
Flash this recovery via SUT LR :
*******************************
(nb0) TWRP Recovery :
https://drive.google.com/…/0B3Wy4Ok3qGszbTVzV3k3ODN0N…/view…
Flash this recovery via SUT LR :
*******************************
(nb0) TWRP Recovery :
https://drive.google.com/…/0B3Wy4Ok3qGszbTVzV3k3ODN0N…/view…
*******************
Fastboot method
*******************
Note: backup your data. Bootloader will erase your data when you flash from locked bootloader!
Fastboot method
*******************
Note: backup your data. Bootloader will erase your data when you flash from locked bootloader!
1. download this ADB and Fastboot file on your PC and Unzip the fastboot/add folder :
http://forum.xda-developers.com/attachment.php…
http://forum.xda-developers.com/attachment.php…
2. Download this recovery file to your PC and place in fastboot/adb folder:
https://drive.google.com/open…
https://drive.google.com/open…
3. Open CMD as administration and run :
fastboot flash recovery <nameofimagefile>
fastboot flash recovery <nameofimagefile>
*********************
Open recovery mode
*********************
Open recovery mode
*********************
Way 1:
1) Phone on cable
2) Hold power+ volume "up"
3) phone restarts, at vibration- release power, keep holing volume until recovery starts.
2) Hold power+ volume "up"
3) phone restarts, at vibration- release power, keep holing volume until recovery starts.
Way 2:
Run on CMD: adb reboot recovery
Way 3 (ROOT):
Download from market any program" reboot recovery"
#############
WORKING XPOSED
#############
WORKING XPOSED
#############
1. Install the installer 3.0 alpha:
http://forum.xda-developers.com/attachment.php…
http://forum.xda-developers.com/attachment.php…
2.Flash this binary through recovery :
https://www.androidfilehost.com/?fid=24269982087003780
https://www.androidfilehost.com/?fid=24269982087003780
Source thread : http://forum.xda-developers.com/…/infocus-m810-custom-roms-…
***************************************************
FEEL FREE TO ASK FOR THE SOLUTION OF YOUR PROBLEM REGARDING THIS HANDSET HERE.
FEEL FREE TO ASK FOR THE SOLUTION OF YOUR PROBLEM REGARDING THIS HANDSET HERE.
Available link for download
Friday, December 9, 2016
Installing Clockwork Mod Recovery
Installing Clockwork Mod Recovery
Warning these files are for the sch-r740c only, these files and procedures will void your warranty and may brick your phone. Use at your own risk assuming all responsibility for loss or damage that may result from use of these files or procedures. You have been warned do not come crying to me! Odin + R740c CWM Touch Recovery Follow these steps very carefully, or you might brick your phone. 1. Download the Odin Flashing Application package on this thread (Recovery roms inside) Extract to a know location 2. Right click on the .exe file inside of the odin folder and select “Run as Administrator” 3. Now that odin is running: 4. CLICK ON THE PDA BUTTON 5. When the file window appears, browse to the appropriate sub directory and select recovery.tar.md5 6. Press Start. DO NOT DISCONNECT, UNPLUG, PLAY WITH ANY BUTTONS, OR CLICK ANYTHING ON EITHER THE PHONE OR COMPUTER UNTIL ODIN HAS FINISHED FLASHING CLOCKWORK RECOVERY ON YOUR PHONE. 7. To boot into recovery, just turn of the phone and press the upper volume button. | |
Available link for download
Sunday, November 6, 2016
Install ClockworkMOD CWM Recovery in all MediaTek Android Device Working 100
Install ClockworkMOD CWM Recovery in all MediaTek Android Device Working 100

Install ClockworkMOD (CWM) Recovery in all MediaTek Android Device Working 100%
No Custom recovery for your device? As Mediatek smartphone chipsets have gained its popularity in the market not only due to its performance but also for its affordability, many users tend to buy these smartphones. However, most MediaTek devices nowadays are produced locally. The problem is the limits bound to these devices when it comes to tweaking such as rooting, installing custom recoveries and more, due to lack of developers for their device. But no worry there are many ways to get things done.Today I’m sharing this method of installing ClockworkMOD which works for all Mediatek device. We will use MTK Droid Tools for the process.
Note : This works only for MTK based android device. If you are trying this on any other device then do it at your own risk. I am not responsible if you brick your phone or if u make any other damage to your phone
Things you need:
- A MediaTek android device (MT65XX)
- Your phone must be rooted already.
- USB Chord.
- Windows PC/Laptop.
- Download ADB Drivers : ADB Drivers.
- Download MTK Droid Tools for Windows : MTK Droid Tools for Windows. [It has no virus as its an .exe files, Google drive always warns users before downloading .exe file.]
How To Flash ClockworkMod (CWM) Recovery on Any MediaTek (MT65xx) Android Device :
1. Download necessary files from above links.
2. Install the downloaded PDANet to your computer. It contains ADB Drivers.
3. Turn on your android device and connect it to your computer using USB Chord. (Make sure to Enable USB Debugging, go to Phone Settings — Developer Options — Enable USB Debugging.)
4. From your computer, open MTK Droid Tools that you have downloaded above and extract it to your desired location.
5. Open MTK Droid Tools.exe from the extracted folder (Run as administrator). Wait for the tool to detect your device. (If UBIFS warning appeared in the status message, this process will not work for you. Only ext4 supported.). Notice on the bottom-left part of the tool, a YELLOW color indicator means that your android device is does not have root shell yet. If it is GREEN already, proceed to step 7. How to ROOT your Mediatek Device or proceed to Step 6.

6. Click ROOT button to enable root shell your device. Wait for the progress bar on the Status, see your phone to Grant Superuser access. If the color indicator turns GREEN, then you have successfully enabled root shell for your device.

7. Now, select the Root, Backup, Recovery tab and and further choose To Use Boot From Phone from the selections. Click Recovery and Boot, a message prompt will appear “To make CWM recovery automatically”, click YES.

8. Wait for the tool to build the CWM recovery and another prompt will appear “install patched boot to phone?” select NO, wait a little bit more and another prompt will appear again “install created recovery to phone”, now select YES.
9. When the tool ask you to reboot your phone to recovery, click Yes and it will reboot to CWM recovery shortly. Check out your new custom recovery.
Congratulations! You now have Installed ClockworkMod custom recovery on your MediaTek android device. You can now enjoy apps that requires Superuser rights, mods and ROMs that requires flashing from CWM.
All the Best!!!
Available link for download
Wednesday, October 26, 2016
Install ClockworkMod Custom Recovery on HTC One
Install ClockworkMod Custom Recovery on HTC One
How to Install ClockworkMod CWM Custom Recovery on HTC-One. ClockworkMod Recovery is now available for the HTC One that you can flash and enjoy extra advanced options on your phone. A custom recovery gives you an extra set of features and options, several of them are advanced, but could come in handy anytime. Our favourite includes the Nandroid backup/restore and installing custom ROMs and other system tweaks. You can now easily install ClockworkMod Touch Recovery on HTC One using our tutorial. Please note, you should unlock HTC One bootloader first before proceeding.
As you continue reading, we will guide you through the process of how to update HTC One with ClockworkMod Custom Recovery. Please note, by doing so, you are voiding the warranty of your HTC One. Make sure to back up your data in case something goes wrong during the process.
We have put together a detailed step-by-step instructions guide on how to install ClockworkMod recovery on HTC One. This is a very simple tutorial and if you have been updating or installing new custom recoveries on HTC phones, then this one should not be any different for you.
Please read every line carefully below. We suggest that you should read the tutorial once before actually performing it on your phone.
Disclaimer: All the custom ROMs and firmwares, official software updates, tools, mods or anything mentioned in the tutorial belong to their respective owners/developers. We or the developers are not to be held responsible if you damage or brick your device.
Important Tips:
- Make sure USB Drivers for Device are installed in your computer. If not, Download USB Drivers First.
- This ClockworkMod Recovery tutorial is only for HTC One. Please don’t try this on any other variants of the phone.
- Make sure you backup all your data in your phone before proceeding.
- This will void your warranty.
- HTC Sync should be installed with full working ADB/Fastboot before performing the tutorial.
- Make sure Bootloader is unlocked. If not, head over to this post -> How to Unlock Bootloader of HTC Phones.
If you have fulfilled all the requirements above, then proceed to the actual tutorial.
How to Install ClockworkMod Custom Recovery on HTC One:
Important: Make sure ADB and Fastboot is configured on your PC. If not, go to the following link and Configure ADB and Fastboot first: How to Set Up ADB and Fastboot with Android SDK.
Step 1 – Connect HTC One to your PC with a USB cable and install ADB drivers.
Step 2 – Download ClockworkMod (CWM_Touch_Recovery_6.0.2.8_M7.img) and copy/paste it in the android-sdk-windowsplatform-toolsdirectory.
Step 3 – Go to Fastboot/Bootloader mode now. To do so, Navigate to android-sdk-windowsplatform-tools directory and open Command Prompt (Shift + Right-click > Open Command Prompt).
Step 4 – Type in the following command and press Enter.
adb reboot bootloader
Step 5 – HTC One will switch OFF and then boot into the Fastboot Mode. Once the drivers are installed, proceed below.
NOTE: Alternatively, you can also enter Fastboot Mode by switching OFF your phone first. Then turn it ON by holding Volume Down + Power buttons together.
Step 6 – Then type the following command and press Enter.
fastboot flash recovery CWM_Touch_Recovery_6.0.2.8_M7.img
Step 7 – Once completed, choose RECOVERY from the Fastboot menu and enter Recovery Mode. Navigate up and down using the volume keys.
Step 8 – If you see Clockwork Touch Recovery, then everything so far has been successfully performed and custom recovery is installed.
Step 9 – Since everything is going on well, you can go back to your normal phone by rebooting HTC One. Select “reboot system now” from the recovery menu. The phone will boot now.
That’s it. Your HTC One has now been updated with a custom recovery like ClockworkMod Recovery and is fully working on your phone.
If you want to access the Recovery Mode, then Turn OFF your phone. Switch ON your phone again by holding Volume Up + Power buttons together and you will be taken directly to the ClockworkMod Touch Recovery menu.
Available link for download
Friday, October 7, 2016
Install CyanogenMod 11 Android 4 4 1 Official Nightly Using Latest CWM Recovery
Install CyanogenMod 11 Android 4 4 1 Official Nightly Using Latest CWM Recovery
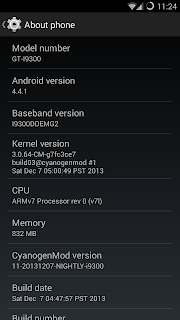
After the stable CM 10.2 Android 4.3.1 release, Yesterday CyanogenMod Team released the Official CM11 Android 4.4 builds for the recent nexus device like Nexus 4, 5, 7, and 10 etc. Today the team made it available to many none nexus devices with the old nexus brother Galaxy Nexus. The CM11 latest nightly is based on the latest Android 4.4.1 build.
Just installed the cm11 ROM in my Galaxy S3 I9300, Touch is very smooth and gives an awesome performance. Tested WiFi,3G Data, Camera, YouTube Playback, Music playback in headphone and loudspeaker, Call, SMS etc. every thing works well.
Update:(10/02/2014)
CM11 M3 Build released with an updated version of the Trebuchet launcher based on Android 4.4 Launcher3 code.The update also include some user experience tweaks, the auto-start tweaks, some additional transparency support, and more.
Note:
I used the latest Clockworkmod recovery to flash the cm11 ROM as some users soft bricked their device flashing cm11 using TWRP and old CMW. So it is recommended to use latest Clockworkmod recovery to flash the CyanogenMod 11 build.
Disclaimer
Flashing custom ROM may brick device or void warranty ... I am not responsible for any damage do at your risk.
Must Note:
- Download the correct ROM zip for your device model
- Use Latest CWM Recovery ( flashing with other recovery may brick the device ) - How To Install Latest Clockworkmod recovery ?
- Make a Nandroid backup or manual backup and copy all data to pc or any external storage
- Your battery must be 50% or above
1. Download CM11 build for your device - Download
2. Download Official Gapps for CM11 - Download
3. Copy both files to sdcard
4. boot into clockworkmod recovery
5. In Order to perform a bug free installation perform all the operations below.
- Select Wipe data/Factory reset - yes
- Select Wipe cache partition - yes
- Go to Mounts and Storage and perform mount system, mount cache and mount data.
- Then Format System - yes
- Then Format cache - yes
- Then Format Data - yes
- Go back main menu of recovery again and go to Advanced-> Wipe Dalvik Cache - yes
6. Now Start Installation Steps
- Select install zip from sd card then choose zip from sdcard, find and locate the downloaded rom zip file and tap Yes to confirm the flashing process.
- After Install the ROM zip similarly install the Google Apps zip file.
7. After Completing all the installation do a wipe again
- Select Wipe data/Factory reset - yes
8. Now Reboot your device.
Thats ...it ...done ....
Just installed the cm11 ROM in my Galaxy S3 I9300, Touch is very smooth and gives an awesome performance. Tested WiFi,3G Data, Camera, YouTube Playback, Music playback in headphone and loudspeaker, Call, SMS etc. every thing works well.
Update:(10/02/2014)
CM11 M3 Build released with an updated version of the Trebuchet launcher based on Android 4.4 Launcher3 code.The update also include some user experience tweaks, the auto-start tweaks, some additional transparency support, and more.
Note:
I used the latest Clockworkmod recovery to flash the cm11 ROM as some users soft bricked their device flashing cm11 using TWRP and old CMW. So it is recommended to use latest Clockworkmod recovery to flash the CyanogenMod 11 build.
Disclaimer
Flashing custom ROM may brick device or void warranty ... I am not responsible for any damage do at your risk.
Install CyanogenMod 11 Official Android 4.4.1 Nightly Using Latest CWM Recovery
Must Note:
- Download the correct ROM zip for your device model
- Use Latest CWM Recovery ( flashing with other recovery may brick the device ) - How To Install Latest Clockworkmod recovery ?
- Make a Nandroid backup or manual backup and copy all data to pc or any external storage
- Your battery must be 50% or above
1. Download CM11 build for your device - Download
2. Download Official Gapps for CM11 - Download
3. Copy both files to sdcard
4. boot into clockworkmod recovery
5. In Order to perform a bug free installation perform all the operations below.
- Select Wipe data/Factory reset - yes
- Select Wipe cache partition - yes
- Go to Mounts and Storage and perform mount system, mount cache and mount data.
- Then Format System - yes
- Then Format cache - yes
- Then Format Data - yes
- Go back main menu of recovery again and go to Advanced-> Wipe Dalvik Cache - yes
6. Now Start Installation Steps
- Select install zip from sd card then choose zip from sdcard, find and locate the downloaded rom zip file and tap Yes to confirm the flashing process.
- After Install the ROM zip similarly install the Google Apps zip file.
7. After Completing all the installation do a wipe again
- Select Wipe data/Factory reset - yes
8. Now Reboot your device.
Thats ...it ...done ....
Available link for download
Subscribe to:
Posts (Atom)