Thursday, December 8, 2016
Installing OS X Snow Leopard Part Three
Installing OS X Snow Leopard Part Three
In Part One of this article, we gathered all required components for a smooth installation, and in Part Two we did the actual OS X install...
But we need to keep booting off a CD with iBoot... Its time to fix that !
...and while we are at it, well pick the optimal MultiBeast options for the GA-P55M-UD4.
If we got the "old" 10.6 OS X Snow Leopard DVD, it doesnt support our Intel Core i7 CPU (support for this CPU was added with the introduction of the Core i5 and Core i7 based iMacs, in 10.6.2).
If we got the 10.6.3 OS X Snow Leopard DVD, we dont have to upgrade to 10.6.4, but we can... so well do it here.
Upgrading to Mac OS X 10.6.4
Remember we downloaded the update and saved it to a USB stick ?Its time to use it...
- Boot your system with the iBoot CD (if its not up and running)
- Plug the USB Stick, and in Finder, navigate to it
- Open the MacOSXUpdCombo10.6.4.dmg
- Double click on MacOSXUpdCombo10.6.4.pkg to run it
- The upgrade procedure is quite straightforward
Just dont reboot when asked to !...
Adding custom drivers for your build

We just have to know which options to select...
Personally, I prefer DSDT-based installations, as this leaves us with an as-vanilla-as-possible build (Vanilla is what we call a system without modifications such as extraneous Kernel Extensions).
So MultiBeast provides the option of using a custom DSDT... Its the UserDSDT option.
For this, well copy from the USB stick the DSDT we downloaded (or edited) in Part One, place it on the Desktop, and make sure its called DSDT.aml
Now its time to run MultiBeast...
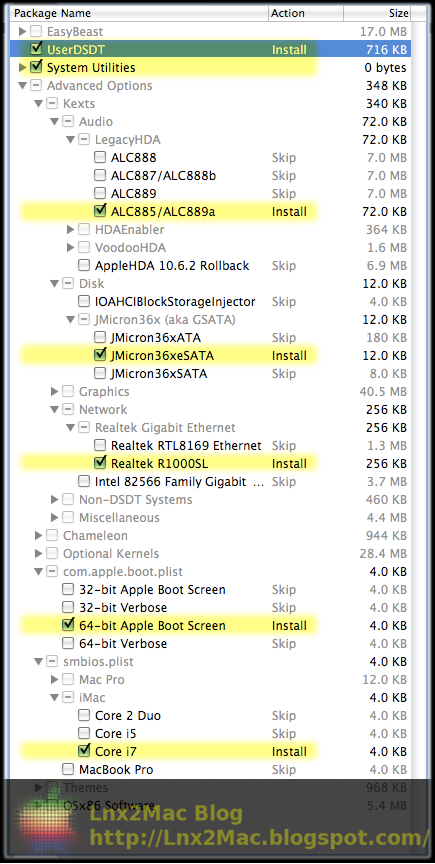
MultiBeast selection for the GA-P55M-UD4
After agreeing to the license, and selecting our System partition for install, we are ready to make our selection...- As we want our DSDT.aml installed, we start by selecting UserDSDT.
The comment states it installs the following:
- our DSDT.aml
- Chameleon 2.0 RC4 by AsereBLN: the bootloader that will allow us to boot off the hard disk, without the iBoot CD
- fakesmc: A kext that emulates a hardware component found in real Macs, so that OS X can run on our build
- 32-Bit com.apple.boot.plist: A configuration file, which directs it to load the 32-bit OS X kernel
- iMac11,1 smbios.plist: A configuration file, which identifies our build as an i5 iMac
- It also states that we have to install with System Utilities tasks, so we check that option too
- As UserDSDT does not include any Network, Sound, or Graphics support (besides the one found in Chameleon), well have to select some Advanced Options
Sound
Sound configuration can be tricky, and many users are confused while configuring it...The reason for the confusion is that configuration is different if using a DSDT or not.
As we are using a DSDT, we dont need an HDAEnabler (that would be for systems without DSDT). Our motherboard uses the ALC889a audio codec, so we just select it (under Advanced Options|Kexts|Audio|LegacyHDA).
Unfortunately (for owners of other boards), as of OS X 10.6.3, AppleHDA no longer supports other codecs (ALC887/888/888b/889), but MultiBeast is smart enough to apply the AppleHDA 10.6.2 Rollback in addition to a LegacyHDA kext.
You might be intrigued by the VoodooHDA kexts. Those are Audio Drivers developed by the Open-Source community, to support other audio codecs. We dont need these.
Disk
If we plan on using IDE drives, well need the JMicron36xATA driver (found under Advanced Options|Kexts|Disk|JMicron36x (aka GSATA)).There, well also find another two drivers, JMicron36xSATA and JMicron36xeSATA. These enable the "white SATA" ports in the Gigabyte motherboard.
We should need at most one of these. If you want to be able to hot-swap eSATA drives, pick the JMicron36xeSATA one.
Youll also find there IOAHCIBlockStorageInjector, which makes all SATA drives appear as internal.
We wont be using it (as we want the minimum number of kexts possible, remember ?)
[Edit: An alternative solution for this is described in Fixing the Orange HardDisk Icons]
Graphics
Chameleon already supports our nVidia card, so we dont need the NVEnabler. Other users might need it.Network
As our motherboard uses an Ethernet controller of the Realtek 8xxx family, well select the RealtekR1000SL option (under Advanced Options|Kexts|Network|Realtek Gigabit Ethernet).Updated 24-Sep-2010: Dont select any option for this, instead check my own Realtek RTL81xx Driver, which is a better alternative to the RealtekR1000SL.
com.apple.boot.plist
While UserDSDT already installed one for us, its 32-bit.Having 8GB RAM, we want the 64-bit Apple Boot Screen (under Advanced Options|com.apple.boot.plist).
Normally, Verbose is recommended for initial installations, but we can always force a verbose boot from the Chameleon prompt upon booting.
smbios.plist
Another one already installed by UserDSDT, but, according to our CPU, we select Core i7 (under Advanced Options|smbios.plist|iMac)Themes
UserDSDT already installed for us the tonymacx86 Theme...OSx86 Software
You can choose here a selection of OSx86 tools. These are optional.Following is a screenshot of the whole selection in MultiBeast v2.1.0:

Verify it matches your selection, and continue...
Enabling sleep
As a final step before rebooting, open System Preferences, select the Energy Saver section, and make sure all three checkboxes are selected. Otherwise, your system might not sleep/wake up correctly.Note that you might need to click the "Lock" in order to modify these settings.
Congratulations !
Your PC runs a fully functional OS X Snow Leopard !...
In future posts well keep improving our system...
Available link for download