Showing posts with label turn. Show all posts
Showing posts with label turn. Show all posts
Tuesday, March 28, 2017
How to Turn Off Factory Mode yellow text on Samsung Galaxy Tab
How to Turn Off Factory Mode yellow text on Samsung Galaxy Tab
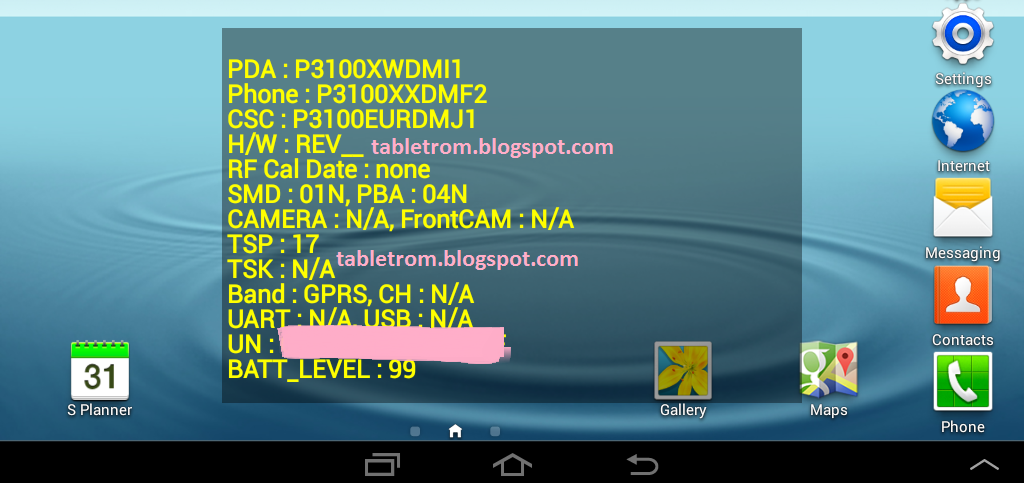
How to Turn Off Factory Mode or Yellow Text on Samsung Smartphones and Samsung Galaxy Tablets.
Samsung manufacturing best tablets and no one have doubt on the quality and software support . samsung galaxy tab are the best tablet to buy . No matter if you talk about samsung galaxy tab specs or samsung galaxy tab price , Samsung Tabs are always on the top list of best tablet to buy.
Disabled Samsung galaxy functions while Factory Mode is turn on Samsung Tablet and Samsung Smartphones :
1. Yellow text on LCD Samsung Galaxy Tab and Smartphones.
2.Directly turn off after pressing power button.
3.Sim data disabled.
4. Unable to open apps while yellow text displaying on tablet.
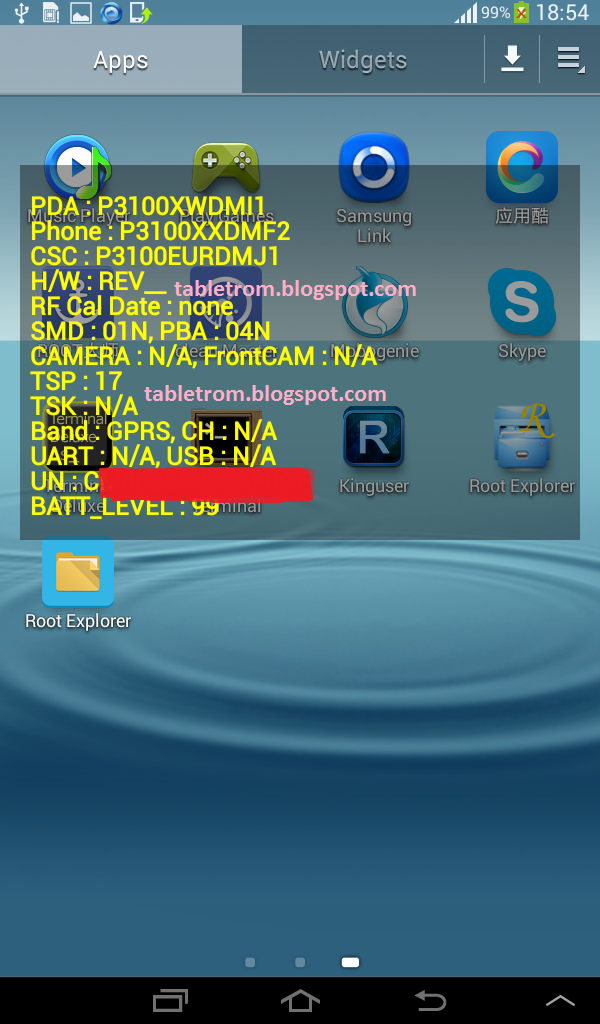
How to Turn off Factory Mode on Samsung Galaxy tab or Samsung Galaxy Smartphones.
There is very easy ways to turn off factory mode or unwanted yellow text on your samsung smartphones or tablet but we will discuss the easy one . You need Superuser (Su) access in both ways. Super User or SU means you have to root your tablet or smartphone first.
How to Root Samsung Smartphones and Samsung Galaxy Tablets.
After successful root SU icon will be displayed on tablet or smartphone. Now you you need to download and install any Terminal Emulator from Google Play Store. Its time play with some commands on Samsung Smart Device.
Open Terminal
Type su (Allow SU to grant access if asked . )
Type rm /efs/factoryApp/keystr (if the message appear "rm failed for /efs/factoryApp/keystr no such directory") ignore it .
Type rm /efs/factoryApp/FactoryMode
Type echo -n ON >> /efs/FactoryApp/Keystr
Type echo -n ON >> /efs/FactoryApp/FactoryMode
Type chown 1000.1000 /efs/FactoryApp/Keystr
Type chown 1000.1000 /efs/FactoryApp/FactoryMode
Type chmod 0744 /efs/FactoryApp/Keystr
Type chmod 0744 /efs/FactoryApp/FactoryMode
reboot
Galaxy tablet or Galaxy Smartphone will be rebooted and you are done. Now the yellow text should not appear because this all happen when efs become corrupted. Now you have successfully repair efs. On / Off mode will be appear again. This method is personally tested on Samsung Galaxy Tab 2 , success rate was 100% . Work like charm.
For reference see image below.
How to Root Samsung Smartphones and Samsung Galaxy Tablets.
After successful root SU icon will be displayed on tablet or smartphone. Now you you need to download and install any Terminal Emulator from Google Play Store. Its time play with some commands on Samsung Smart Device.
 |
| Terminal Emulator |
Open Terminal
Type su (Allow SU to grant access if asked . )
Type rm /efs/factoryApp/keystr (if the message appear "rm failed for /efs/factoryApp/keystr no such directory") ignore it .
Type rm /efs/factoryApp/FactoryMode
Type echo -n ON >> /efs/FactoryApp/Keystr
Type echo -n ON >> /efs/FactoryApp/FactoryMode
Type chown 1000.1000 /efs/FactoryApp/Keystr
Type chown 1000.1000 /efs/FactoryApp/FactoryMode
Type chmod 0744 /efs/FactoryApp/Keystr
Type chmod 0744 /efs/FactoryApp/FactoryMode
reboot
Galaxy tablet or Galaxy Smartphone will be rebooted and you are done. Now the yellow text should not appear because this all happen when efs become corrupted. Now you have successfully repair efs. On / Off mode will be appear again. This method is personally tested on Samsung Galaxy Tab 2 , success rate was 100% . Work like charm.
For reference see image below.
  |
| ON/OFF Menu Appear |
 |
| No Yellow Text found |
Available link for download

Thursday, February 2, 2017
How to Turn on USB Debugging in Huawei Honor 3X
How to Turn on USB Debugging in Huawei Honor 3X
Many users cannot find USB debugging in their Huawei Honor 3X phones, so they are unable to turn it on when there is necessity to do so. In consequence, this text will illustrate the method to turn on USB debugging in Huawei Honor 3X in detail.

Firstly, enable developer mode in the phone.
1ststep: Open Settings.
2ndstep: Find and choose About phone.
3rdstep: Locate Build number and click it for 6 to 8 times until a prompt informs you that developer mode has already been enabled.
Secondly, find and turn on USB debugging in Developer options.
1ststep: Go back to Settings.
2ndstep: Click Developer options in Settings.
3rd step: Select USB debugging and choose OK in the pop-up window to confirm allowing USB debugging.
Related Articles:
How to Set Password on HUAWEI Honor 3X
Huawei Android USB Drivers
How to Set Password on HUAWEI Ascend P6/P7
Available link for download
Monday, January 16, 2017
How To Turn Of Windows Phone Camera Shutter and Screenshot Sound
How To Turn Of Windows Phone Camera Shutter and Screenshot Sound
 Most of us know how to take a screen shot in windows mobile. It is a very easy and fast procedure when compared to Android. The key combination is common for all windows phones (hold power and tap the windows button or press power and windows button together... On successful you will hear a screenshot sound).
The screenshot sound is same as the camera capture sound, So it may drive you into trouble, especially when you are in public places. The people look up and may think you are taking pictures of them. The sound will produce even the phone is in silent mode.
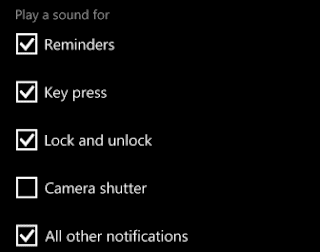
In this post I included the option to disable windows phone screenshot sound as well as the camera shutter sound. Both of the sounds can disable by unchecking the Camera shutter option in ringtones + sounds. Here are the complete steps..
Windows Phone Disable Camera shutter and Screenshot sound
1. Go to Settings > ringtones + Sounds2. Uncheck Camera shutter.
Thats it..
Available link for download
Wednesday, January 4, 2017
How To Turn Off Camera Shutter Sound in Galaxy Note 3 Note 2 And Many Other Android Devices
How To Turn Off Camera Shutter Sound in Galaxy Note 3 Note 2 And Many Other Android Devices

In this post I included all the available methods to disable camera shutter sound in Galaxy Note 3 and Note 2. If you have a different android phone try any of the method available in this post. Any of the method may work.
Method 1:
For those users of Galaxy Note 2 and Note 3 which have enabled the option to turn off the camera shutter sound by default.
1. Open your Camera Application.
2. In the camera app, click the Settings softkey.
3. On the next dialog...select settings tab ( third tab )
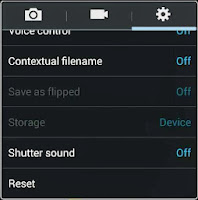
4. Finally Scroll down and tap on Shutter sound to off it.
Method 2 ( Require Root )
This method enables the hidden Shutter sound menu in Galaxy Note 3 and Note 2. You need to root the phone to get it work.
1. Download and install Note 2 Hidden Settings app from Play Store
2. Open the installed app and scroll down to get CAMERA SETTINGS
3. Under camera settings Toggle ON Add shutter sound menu and tap on Apply button.

4. Exit the app...and follow the Method 1.
Method 3
This method uses the app Enforced Stream Silencer to mute the camera shutter sound. This method works with many android devices other than Note 3 and Note 2..try your luck.
1. Download and install Enforced Stream Silencer from here
2. Open the app and check Disable STREAM_SYSTEM_ENFORCED.
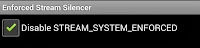
3. Finally exit the app...done..
Available link for download
Monday, December 12, 2016
How to Turn on USB Debugging in Moto E
How to Turn on USB Debugging in Moto E

Aimed at the lower end of the market, Moto E, with competitive price, Android 4.4.2, 4.3-inch screen, replaceable rear cover, waterproof coating and other facilities, has been launched this month. In the meantime, many customers who have already owned it are long for knowing how to find USB debugging in it. As a result, this article will introduce how to locate and turn on USB debugging in Moto E step by step.
Step 1: Enter Apps and open Settings.
Step 2: Locate and select About phone.
Step 3: Find Build number and keep clicking it until the prompt of “You are now a developer!” turns up.
Step 4: Return to Settings and click Developer options in it.
Step 5: Choose USB debugging and tap OK to turn it on.
Related Articles:
Motorola USB Drivers for Android Phones
How to Retrieve Deleted Phone Contacts from Motorola Moto G Android
Available link for download
Sunday, November 13, 2016
How to Turn Off Safe Mode on Android
How to Turn Off Safe Mode on Android
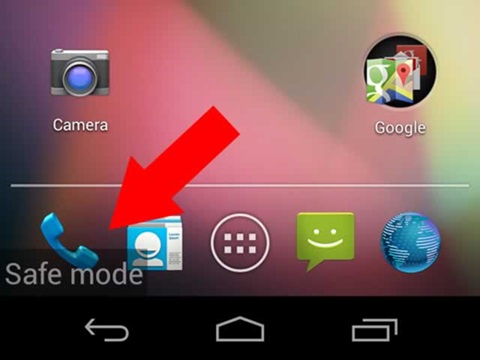
How to Turn Off Safe Mode on Android
Android is a customization-friendly and highly versatile mobile operating system, but it is always doomed by the fragmentation problem. Android fragmentation is a universal problem that is due to the diversity in various Android devices and OS versions, which makes it a nightmare to app developers. An Android app developer has to write extra bits of code to make the app compatible with wide range of chipsets and OS versions. This isn’t an issue with the iOS as the hardware and software are controlled by Apple.
Due to this fragmentation problem, some apps might act weird in few devices or OS versions. However, the worst thing is that you can’t distinguish whether the issue is from an app or system-related. Luckily, Android environment comes with a Safe Mode that helps you troubleshoot the perky problems on your device. It’s quite simple to enter the Safe mode on Android, but sometimes it’s a bit annoying to get out of it. Most people get into safe mode without their knowledge and stuck in there wondering how to get out of it.
In this tutorial, we will show you how to enter and exit Safe Mode on Android in few simple steps.
Enter Safe Mode on Android
Method 1:
- Long press the power button on your Android device to bring up the power menu.
- Now, long press the Power Off option until you see a pop-up “Reboot to Safe Mode”. Click on OK to reboot into Safe Mode.

Method 2:
If you’re running on an older version of Android device, the first method might not work for you. Instead, try the below method for good chances to get into safe mode.
- Power off your device.
- Power it on again and when you see the boot logo, press and hold the volume up button until you see the Safe Mode watermark on the lower left-hand side of the display.
- If you couldn’t boot into safe mode still, try by pressing either Volume Down or Menu button. The key combination depends on the device make and model, so you should go with trail and error method.

Turn Off Safe Mode on Android
Sometimes, a simple reboot from Safe Mode is sufficient to get out of it. But if you are stuck in safe mode and the reboot didn’t work out for you, follow the below steps to turn off safe mode on Android.
Method 1:
- Power off your device.
- Power it on again and when you see the boot logo, press and hold theVolume Down and Power buttons at the same time.
- If this doesn’t workout, try using the Volume Up button along with Power button to get out of the Safe mode.
Method 2:
- Power off your device.
- Remove the battery from the device and wait for a couple of minutes before you re-insert the battery.
- It usually takes a couple of minutes for any residual charges to settle down. So, be patient for a few minutes before you insert the battery.
- Now, try powering ON the device.
Ideally, you should be out of Safe Mode by now. But if you’re still stuck in Safe Mode, opt for a full factory reset as a last resort.
Available link for download
Friday, November 11, 2016
How to Turn on USB Debugging in LG G2
How to Turn on USB Debugging in LG G2
Many customers using LG G2-series phones are totally unaware of the method to turn on the USB debugging in their phones. Therefore, this article will illustrate the concrete way in detail.
Step 1: Open Settings and access General.
Step 2: Choose About phone in General settings.

Step 3: Open Software information.

Step 4: Tap Build number continuously until the information of “You are now a developer!” shows up.

Step 5: Return to General in Settings, and click the newly-presented Developer options.

Step 6: Choose USB debugging.

Step 7: Click Yes in the pop-up window to allow USB debugging.

In brief, the steps above enable users to efficiently turn on USB debugging in LG G2.
Related article:
LG USB Drivers for Android Devices
Related article:
LG USB Drivers for Android Devices
Available link for download
Subscribe to:
Posts (Atom)