Showing posts with label mediatek. Show all posts
Showing posts with label mediatek. Show all posts
Sunday, January 29, 2017
Install MediaTek Preloader USB VCOM Port pada windows
Install MediaTek Preloader USB VCOM Port pada windows
Saya akan share Tutorial cara penginstallan MediaTek Preloader USB VCOM Port pada windows7/8, hal ini sangat diperlukan ketika Flash ulang Android. Okay langsung ke materi.
Peralatan yang diperlukan :
- Driver USB VCOM Driver [http://adf.ly/1Rd3ip]
Langkah install :
1. Extract File USB VCOM Driver dan HP harus tersambung ke Komputer dalam keadaan menyala.

2. Klik Start Menu - Klik kanan pada My Computer - Manage - Computer Management - klik (1)Device Manager - Klik sembarang pada bagian sebelah kanan misal (2)Other Devices - Klik Menu (3)Action - pilih (4) Add legacy hardware.

3. Anda akan diarahkan ke menu Add Hardware - Next.
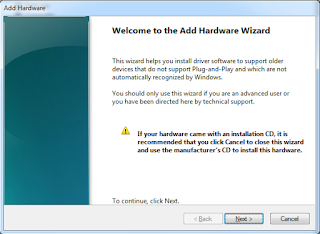
4. Pilih yang bawah "Install the hardware that I manually select from a list (Advanced)" pilihan ini untuk penginstallan driver secara manual.

5. Pada pilihan "Common hardware types:" biarkan Cursor tetap di "Show All Devices" dan tekan Next.

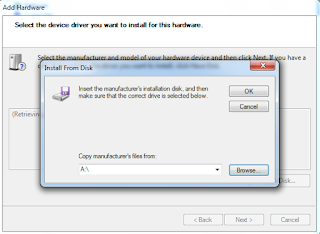
6. Pada pilihan "Select the device driver you want to install for this hardware" tekan "Have Disk...".

7. Pada pilihan "Install From Disk" - klik "Browse" arahkan ke folder "USB VCOM DriverWin7" dan file "usb2ser_Win7.inf" lalu klik open kemudian tekan OK. (Note : sesuaikan file dengan bit dan OS Windows yang digunakan, jika 64 Bit gunakan yang 64).

8. Pada pilihan "Model" pilih yang paling atas "Mediatek DA USB VCOM Port" lalu next dan tunggu sampai driver terinstall. (Note : pada poin nomor 9 lakukan hal ini pada 4 Model dibawahnya)

- Jika muncul Windows Security pilih "Install this driver software anyway" dan tunggu sampai proses install driver selesai.

- Jika sudah selesai proses install driver "Mediatek DA USB VCOM Port" akan muncul "Completing the Add Hardware Wizard" dan pada Port Device Manager muncul Mediatek DA USB VCOM Port (COMx) dengan gambar tanda seru berwarna kuning, abaikan tanda serunya. Pada tahap ini sudah selesai penginstallan "Mediatek DA USB VCOM Port".


9. Ulangi poin nomor 2 hingga nomor 8 pada 4 model dibawah ini, untuk file "usb2ser_Win7.inf" sama saja.
- Mediatek PreLoader USB VCOM Port
- MTK USB Debug Port
- MTK USB Modem Port
- MTX USB Port
10. Jika sudah selesai secara keseluruhan maka pada port Device Manager akan muncul 5 port plus dengan posisi COM-nya.
- Mediatek DA USB VCOM Port(COM1)
- Mediatek PreLoader USB VCOM Port(COM4)
- MTK USB Debug Port(COM5)
- MTK USB Modem Port(COM6)
- MTX USB Port(COM7)


Semoga Tutor ini membatu, amin :D
Author : M.Shohib / Mr.Oib a.k.a Sudden_death
Available link for download

Sunday, November 6, 2016
Install ClockworkMOD CWM Recovery in all MediaTek Android Device Working 100
Install ClockworkMOD CWM Recovery in all MediaTek Android Device Working 100

Install ClockworkMOD (CWM) Recovery in all MediaTek Android Device Working 100%
No Custom recovery for your device? As Mediatek smartphone chipsets have gained its popularity in the market not only due to its performance but also for its affordability, many users tend to buy these smartphones. However, most MediaTek devices nowadays are produced locally. The problem is the limits bound to these devices when it comes to tweaking such as rooting, installing custom recoveries and more, due to lack of developers for their device. But no worry there are many ways to get things done.Today I’m sharing this method of installing ClockworkMOD which works for all Mediatek device. We will use MTK Droid Tools for the process.
Note : This works only for MTK based android device. If you are trying this on any other device then do it at your own risk. I am not responsible if you brick your phone or if u make any other damage to your phone
Things you need:
- A MediaTek android device (MT65XX)
- Your phone must be rooted already.
- USB Chord.
- Windows PC/Laptop.
- Download ADB Drivers : ADB Drivers.
- Download MTK Droid Tools for Windows : MTK Droid Tools for Windows. [It has no virus as its an .exe files, Google drive always warns users before downloading .exe file.]
How To Flash ClockworkMod (CWM) Recovery on Any MediaTek (MT65xx) Android Device :
1. Download necessary files from above links.
2. Install the downloaded PDANet to your computer. It contains ADB Drivers.
3. Turn on your android device and connect it to your computer using USB Chord. (Make sure to Enable USB Debugging, go to Phone Settings — Developer Options — Enable USB Debugging.)
4. From your computer, open MTK Droid Tools that you have downloaded above and extract it to your desired location.
5. Open MTK Droid Tools.exe from the extracted folder (Run as administrator). Wait for the tool to detect your device. (If UBIFS warning appeared in the status message, this process will not work for you. Only ext4 supported.). Notice on the bottom-left part of the tool, a YELLOW color indicator means that your android device is does not have root shell yet. If it is GREEN already, proceed to step 7. How to ROOT your Mediatek Device or proceed to Step 6.

6. Click ROOT button to enable root shell your device. Wait for the progress bar on the Status, see your phone to Grant Superuser access. If the color indicator turns GREEN, then you have successfully enabled root shell for your device.

7. Now, select the Root, Backup, Recovery tab and and further choose To Use Boot From Phone from the selections. Click Recovery and Boot, a message prompt will appear “To make CWM recovery automatically”, click YES.

8. Wait for the tool to build the CWM recovery and another prompt will appear “install patched boot to phone?” select NO, wait a little bit more and another prompt will appear again “install created recovery to phone”, now select YES.
9. When the tool ask you to reboot your phone to recovery, click Yes and it will reboot to CWM recovery shortly. Check out your new custom recovery.
Congratulations! You now have Installed ClockworkMod custom recovery on your MediaTek android device. You can now enjoy apps that requires Superuser rights, mods and ROMs that requires flashing from CWM.
All the Best!!!
Available link for download
Subscribe to:
Posts (Atom)